logotype
  • Asanas
  • Pranayamas
  • Meditation
  • Blog
  • About Us
  • Contacts
make an appointment
logotype
logotype
  • Asanas
  • Pranayamas
  • Meditation
  • Blog
  • About Us
  • Contacts
Blog001
HomeBlog001
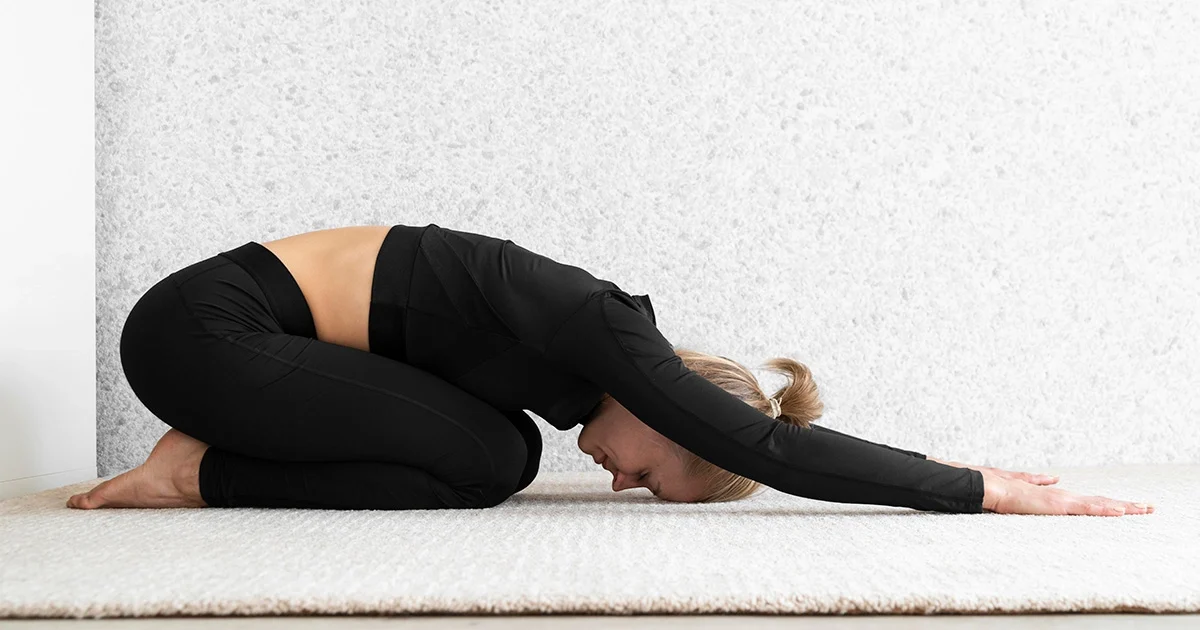
A yoga practitioner demonstrates relaxing alignment and deep spinal decompression while resting in Balasana.
BlogLife StyleTrendingYoga
March 12, 2026By bharatyogas0 Comments

Shishuasana-Child’s Pose

Shishu Asana (Child's Pose)

Table of Contents

  1. Introduction
  2. How to Do Shishu Asana
  3. Benefits
  4. Tips for Better Practice
  5. Why Learn with a Yoga Teacher or Instructor
  6. Cautions and Contraindications
  7. Conclusion
  8. FAQS

Introduction

Every yoga teacher says it eventually: “If you need to rest, come into Child’s Pose.” It’s the universal permission slip — drop out of the sequence, breathe, come back when you’re ready.

That reputation as the default rest pose is also why it doesn’t get taken seriously. People collapse into it for ten seconds, think they’ve rested, and push back into the next posture. It becomes a pause button. Which is a waste, because it’s genuinely doing something — assuming you actually stay in it.

Shishu means child. The shape mimics the fetal resting position: knees bent, hips back toward heels, forehead on the floor. Done properly — meaning with a real hold, not a ten-second cameo — it decompresses the lumbar spine, calms the nervous system, and stretches the hips and lower back in ways that a lot of other poses don’t quite reach.

How to Do Shishu Asana

Start kneeling. Bring the knees together or hip-width apart. Sink the hips back toward the heels and fold the torso forward over or between the thighs. Forehead goes to the floor — or on a block or blanket if the floor isn’t reachable yet.

Arms can go two ways: extended forward alongside the ears for a more active shoulder stretch, or resting alongside the body with palms facing up near the feet for a quieter, more passive shape.

Once you’re in, let the weight go. Forehead down. Shoulders dropped. Belly soft. Breath slower than it was.

Stay for 1 to 5 minutes. Not ten seconds — minutes.

Wide-knee variation: Tight hips often prevent the torso from lowering comfortably between the thighs. Spreading the knees wider solves this — the belly drops through and the fold opens up. This is also the version that works during pregnancy, when the belly needs room.

Benefits

Spinal decompression. The lumbar spine gently flexes in this position, and the vertebrae separate slightly. For anyone spending long hours sitting or standing, this feels tangible within the first minute of a real hold. The key word being real — the nervous system doesn’t shift in ten seconds.

Hip and lower back stretch. The hips flex, the glutes stretch, the muscles along the sacrum and lumbar lengthen. Tight hips respond to this slowly, but they respond. A few honest minutes of Child’s Pose changes how the lower body feels.

Nervous system calming. Forehead down, eyes closed, belly lightly compressed by the thighs — the parasympathetic nervous system gets activated fairly reliably. Heart rate drops. Mental noise quiets. It’s one of the more direct routes to the rest-and-digest state, particularly for people whose stress response runs hot.

Counterpose. After backbends — Ustrasana, Dhanurasana, Chakrasana — the spine wants the opposite direction. Child’s Pose provides it immediately and without effort. After long standing sequences, it gives the legs and back a genuine break rather than just a change of position.

Breath awareness. When the belly presses against the thighs, each inhale becomes visible as the ribs expand sideways and into the back. Diaphragmatic breathing becomes something you feel rather than something a teacher has to describe. That’s more useful than most verbal instruction.

Tips for Better Practice

Stay longer than you want to. Two minutes is where real rest starts. Three is where the hips and lower back actually release. The urge to come out early is usually just restlessness — notice it, stay anyway.

Get a blanket under your forehead. If it doesn’t reach the floor, your neck is working and the pose isn’t restful. Physical comfort here isn’t a luxury — it’s the condition that makes rest possible.

Roll a blanket between the thighs and calves. This is the single most useful modification for people with tight quads or knee discomfort. It changes the pose from something to endure to something that actually works.

Let the shoulders go more than once. In the arms-forward version, people often think they’ve released their shoulders when there’s another layer waiting. Send the shoulder blades outward and let the chest melt. It’s usually there if you look for it.

Breathe into the back body. In Child’s Pose, the back ribs expand on the inhale. Directing breath there turns a passive rest posture into active spinal mobility work — a small shift that changes the texture of the whole thing.

Why Learn with a Yoga Teacher

The point of a teacher in Child’s Pose isn’t instruction — the shape isn’t complicated. It’s what they can do with their hands.

A steady press on the sacrum encourages it toward the floor and heels, deepening the hip and lower back release in a way that’s simply not self-administerable. Hands on the upper back guide breath into the back ribs. A touch on the shoulders gives them permission to drop. These are subtle contacts, but practitioners routinely discover they were holding tension they didn’t know was there — and it takes someone else’s hands to find it.

Cautions and Contraindications

Knee injuries: A blanket roll between the thighs and calves reduces how far the knee flexes. If kneeling causes pain regardless of props, skip the pose.

Pregnancy: Use the wide-knee variation. Later in pregnancy, a bolster under the chest may also help.

High blood pressure: Prolonged holds with the head below the heart may not be appropriate. Check with a doctor for longer stays.

Ankle injuries or stiffness: A rolled blanket under the ankles reduces the plantar flexion demand considerably.

Conclusion

The tendency is to rush through Child’s Pose — treat it as the gap between the real poses, take ten seconds, move on. That misses what’s actually on offer when you stay. The decompression is real. The nervous system shift is real. None of it happens quickly; it needs a few minutes and genuine stillness, which is harder than it sounds.

Most people aren’t that good at stopping. Child’s Pose, done well, practices exactly that.
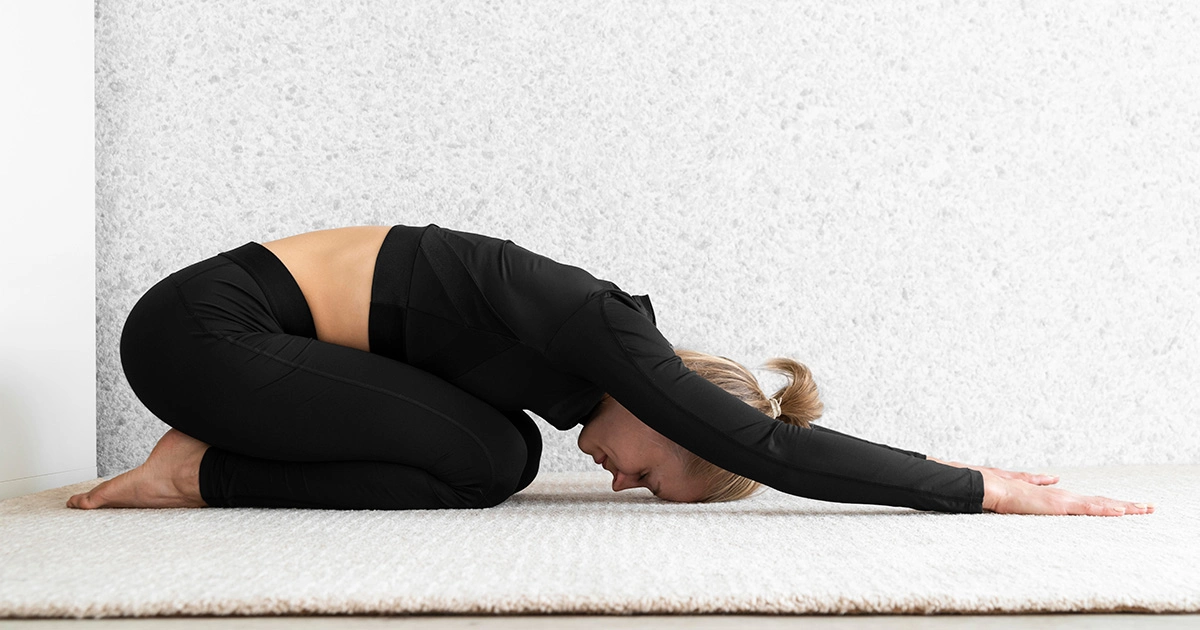
A yoga practitioner demonstrates relaxing alignment and deep spinal decompression while resting in Balasana.

FAQs

Q: Is Shishu Asana the same as Balasana?

Largely yes — in Indian yoga traditions the names are used interchangeably. Both describe the kneeling forward fold with forehead to the floor.

Q: When should I use Child’s Pose?

Whenever you need to. There’s no rule about when it’s permitted. Tired, dizzy, overwhelmed, or just not ready for the next posture — come into it.

Q: My knees are uncomfortable. What helps?

A folded blanket between the thighs and calves fixes this for most people. If the knees are still uncomfortable, try the wide-knee variation.

Q: Is it actually good for stress and anxiety?

Yes. The combination of forward fold, forehead contact, and slowed breath activates the parasympathetic nervous system — not over weeks of practice, but within the pose itself, in a few minutes.

Q: Can I do Child’s Pose in bed?

You can. A soft mattress changes how the body settles, but the shape still provides spinal flexion and hip opening. Worth doing even without a mat.

Q: Who should avoid Shishu Asana?

People with knee injuries, severe ankle stiffness, or very late pregnancy where even the wide-knee version is uncomfortable.
READ MORE
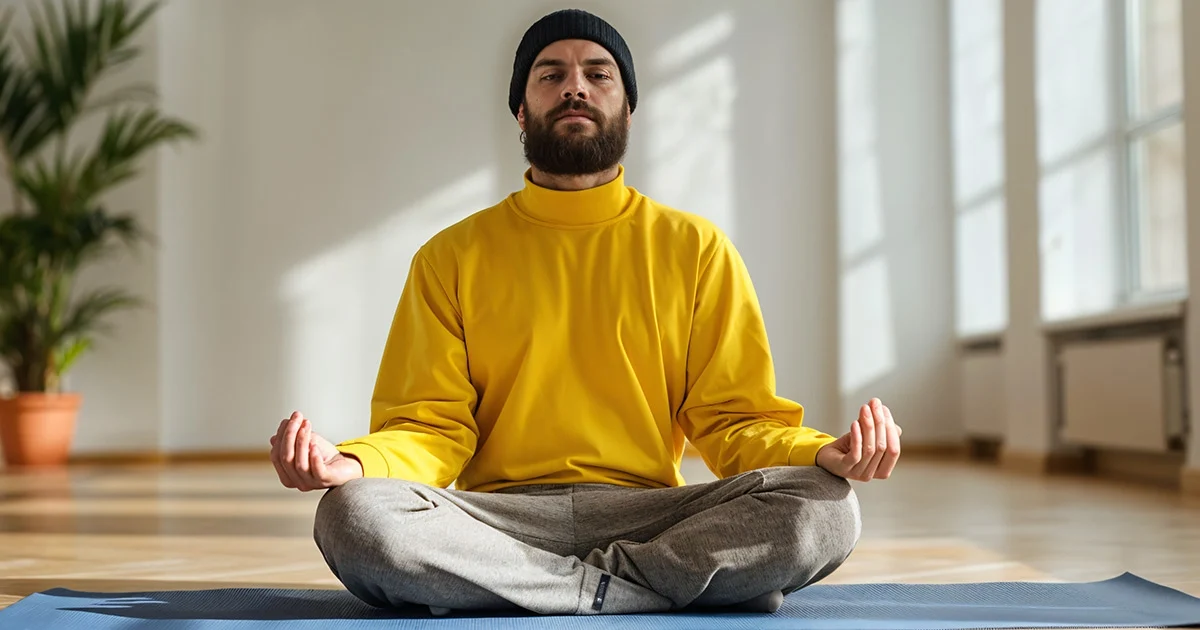
A yoga practitioner demonstrates proper pelvis propping and neutral spinal alignment while seated in Sukhasana.
BlogLife StyleTrendingYoga
March 11, 2026By bharatyogas0 Comments

Sukhasana-Easy Pose

Sukhasana (Easy Pose) Nothing Easy About Sitting Well

Table of Contents

  1. Introduction
  2. How to Do Sukhasana
  3. Benefits
  4. Tips for Better Practice
  5. Why Learn with a Yoga Teacher or Instructor
  6. Cautions and Contraindications
  7. Conclusion
  8. FAQS

Introduction

The name is a trap. Sukha means ease or comfort. Asana means posture. Easy Pose. You sit cross-legged on the floor and breathe. How hard could it be?

For children, not very. For adults who’ve spent decades sitting in chairs, it’s often genuinely uncomfortable within a few minutes — the hips ache, the lower back rounds, the knees hover well off the floor, and the whole thing feels wrong in a way that’s embarrassing given that it’s supposed to be the beginner’s seat.

That discomfort is useful information. It reveals exactly what years of chair-sitting has done to the hips, the inner thighs, the hip flexors, and the lower back’s ability to maintain a neutral curve without support. Sukhasana shows you where the work is needed.

And done correctly — with appropriate props, genuine spinal lift, and consistent practice — it’s one of the more sustainable meditation and pranayama seats available. Not because it becomes comfortable overnight, but because the work to make it comfortable is exactly the work that makes the rest of the practice better.

How to Do Sukhasana

Sit on the floor with legs crossed — one shin in front of the other, not the pretzel of Padmasana, just crossed shins. The feet can be in front of you rather than tucked in if that’s more accessible.

Check the pelvis. The sit bones should press into the floor and the pelvis should be in a neutral position — not rolled backward (which rounds the lower back) and not excessively anteriorly tilted (which over-curves it). For most people with tight hips, sitting on a folded blanket or meditation cushion immediately helps the pelvis find this neutral position.

From a neutral pelvis, lift through the crown of the head. The spine stacks. The chest opens. The shoulders relax. The chin stays level.

This is Sukhasana. Hold it for 1 to 5 minutes for a seated practice, or for the duration of meditation or pranayama.

Benefits

Hip flexibility development. Sustained cross-legged sitting stretches the hip external rotators, the inner thighs, and the hip flexors in ways that chair-sitting never does. Over months of consistent practice, the hips open, the knees lower, and the position becomes progressively more comfortable — evidence of genuine flexibility change.

Accessible meditation and pranayama seat. For practitioners not yet ready for Padmasana or Siddhasana, Sukhasana provides an upright seated position that supports breathing practice and meditation without requiring extreme hip flexibility. It’s the entry point for all seated spiritual practice in yoga.

Postural training. Maintaining an upright spine in Sukhasana without a backrest requires and develops the postural muscles of the lower back, mid-back, and core. The effort required drops over months as the muscles adapt and the hips open, making the pose progressively less of a workout and more of a resting seat.

Grounding. The wide-base seated position with both sit bones on the floor creates a different quality of groundedness than any chair provides. Practitioners consistently report that sitting cross-legged on the floor for even 5 minutes has a settling effect on the nervous system that chair-sitting doesn’t replicate.

Tips for Better Practice

  • Use a blanket or cushion. Sitting on 2 to 4 inches of elevation changes the hip and pelvis geometry enough to make the pose significantly more comfortable and the spine significantly more upright. This is not a crutch; it’s anatomy. Use props appropriately.
  • Alternate which leg is in front. Most people have a habitual crossing preference. Working both sides keeps the hip flexibility developing symmetrically.
  • Check the spine regularly during longer holds. The back tends to round gradually over time in seated postures, and the roundings happens below conscious awareness. Building the habit of checking and correcting every few minutes is worthwhile.
  • If the knees are significantly above hip height and the lower back rounds immediately, the hips are too tight for effective Sukhasana today. Use a higher prop, or practice other hip openers first and return to cross-legged sitting as the hips open.
  • Breathe slowly and deliberately in the pose. Sukhasana is where the breath practice lives, and the quality of breath in the seated position is as important as the alignment.

Why Learn with a Yoga Teacher or Instructor

Teachers help students find the appropriate prop height — blanket thickness, cushion type — for their current hip flexibility. This is more specific than it sounds; a blanket that’s too thin doesn’t solve the pelvic tilt problem, and one that’s too thick creates a different set of alignment issues.

For students using Sukhasana as a meditation or pranayama seat, a teacher can refine the spinal alignment and hand position, and introduce the breath practices that the seated position supports. The difference between sitting in Sukhasana and practicing in Sukhasana is largely what a teacher provides.

Cautions and Contraindications

  • Knee injuries: Cross-legged sitting places the knee in a flexed, externally rotated position. If this is painful with knee pathology, sit in Vajrasana (if comfortable) or use a chair instead.
  • Severe hip tightness causing back pain: If sustained cross-legged sitting causes lower back pain despite propping, the hips are not yet ready. Work on hip opening postures and return as flexibility develops.
  • Sciatica: Some sciatic presentations are aggravated by cross-legged sitting. Monitor carefully.

Conclusion

Sukhasana is where most yoga practices begin and where meditation practices live. The work to make it genuinely comfortable — opening the hips, developing the back strength to maintain an upright spine, learning to breathe fully in the seated position — is foundational work that improves everything else.

It gets easier. Slowly, consistently, over months. And when it does, the quality of practice that becomes available in the seated position is worth everything the hip-opening work costs.

FAQS

Q: Is Sukhasana really as easy as it sounds?

A: For people with tight hips, sitting cross-legged on the floor is genuinely difficult. The knees are often higher than the hips, which makes the lower back strain. It’s “easy” relative to lotus, not necessarily easy in absolute terms.

Q: Should I sit on a block or blanket in Sukhasana?

A: If your knees are above your hips, yes — prop up the hips. It makes maintaining an upright spine much easier.

Q: How long can I sit in Sukhasana?

A: As long as you’re comfortable. For meditation, 20 to 60 minutes is common. Alternate which leg is in front each session.

Q: Is Sukhasana good for everyone?

A: It’s generally accessible, but people with knee or hip pain may need to adjust with props or use a chair.

Q: Does sitting in Sukhasana improve hip flexibility?

A: Over time, yes — regular seated practice does open the hips, especially if combined with active hip-opening poses.

Q: Can children sit in Sukhasana?

A: Kids tend to drop into it effortlessly. It’s one of those poses that gets harder as we age and get stiffer.

READ MORE
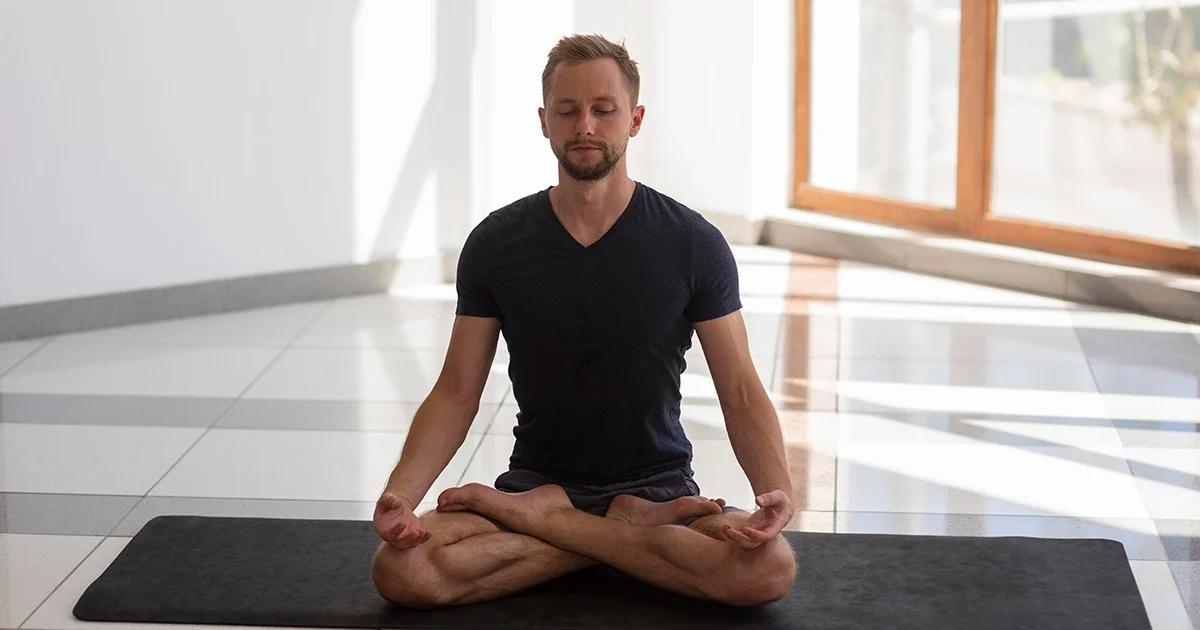
A yoga practitioner keeping a long, upright spine and level hips while demonstrating correct leg alignment in Padmasana.
BlogLife StyleTrendingYoga
March 10, 2026By bharatyogas0 Comments

Padmasana-Lotus Pose

Padmasana (Lotus Pose) The Pose Most People Should Stop Rushing Toward

Table of Contents

  1. Introduction
  2. How to Do Padmasana
  3. Benefits
  4. Tips for Better Practice
  5. Why Learn with a Yoga Teacher or Instructor
  6. Cautions and Contraindications
  7. Conclusion
  8. FAQS

Introduction

Padmasana is probably the most recognized yoga posture in the world — the cross-legged seated position with feet resting on opposite thighs, spine upright, the image of meditation itself. It appears on ancient temple sculptures, modern meditation apps, and every third yoga-related photograph online.

It’s also the pose most people try to force before their hips are ready for it, which causes knee injuries that set their practice back by months.

Padma means lotus. The legs folded into the position are said to resemble the petals of a lotus flower. More practically, the pose creates a stable, grounded base for extended seated practice — once the body is genuinely ready for it. The stability and the upright spine that Padmasana allows when practiced in a truly open hip are real and different from what simpler seated positions provide.

But the key phrase is “when the body is genuinely ready.” Padmasana requires substantial hip external rotation flexibility — more than most adults have without years of consistent hip-opening practice. Forcing the legs into position when the hips aren’t ready routes the rotational force to the knee, a joint that was not designed to rotate. Knee injuries in Padmasana are extremely common and entirely avoidable.

How to Do Padmasana

Sit in Dandasana (Staff Pose) with legs extended. Take the right leg first: bend the right knee and cradle the right shin in both hands, ankle in one hand and knee in the other. Gently rock the shin side to side to loosen the hip. Then, keeping the right ankle flexed to protect the knee, place the right foot on the left thigh — as high up toward the hip crease as comfortable.

Now the left leg: bend the left knee and, again keeping the ankle flexed, bring the left foot to rest on the right thigh.

The hips do the rotation. If the knees are high off the floor and there’s any discomfort in the knee joint specifically, this is the hip telling you it needs more external rotation range before the full pose is appropriate. Use half Lotus (one foot on thigh, one foot on floor) or Sukhasana instead.

Once both feet are placed, sit as tall as possible. The spine lifts. The hands rest on the knees in a mudra of choice, or palms face up in the lap. Close the eyes. Breathe.

Benefits

Stable meditation seat. For practitioners with adequate hip external rotation, Padmasana creates a lower, more stable base than cross-legged sitting. The geometry of the pose — wide base, stacked spinal column — allows the postural muscles to maintain an upright spine with less active effort than other seated positions. This matters for extended meditation or pranayama practice.

Hip external rotation. The position requires and, over time, develops external rotation at the hip joint. The piriformis, obturator internus, and other deep external rotators all stretch in the pose. Practiced consistently over months and years, Padmasana genuinely develops hip mobility.

Ankle and knee awareness. When properly aligned with the ankle flexed and the rotation occurring at the hip rather than the knee, the pose develops awareness of the distinction between hip rotation (appropriate) and knee rotation (inappropriate) — a kinesthetic distinction that improves movement quality across many other postures.

Grounding and stillness. The wide, stable base of Padmasana creates a physical quality of groundedness that practitioners consistently report. Whether this is mechanical (lower center of gravity, more contact with the floor) or neurological (the sustained sensory input from the position) or something else, the felt quality of settled stillness in a mature Padmasana is distinctive.

Tips for Better Practice

  • Flex the ankles. This is the single most important protection for the knee in this pose. A neutral or plantar-flexed (pointed) ankle allows the foot to slide off the thigh, which creates knee rotation strain. A dorsiflexed (flexed) ankle keeps the foot in place and protects the joint.
  • Do not force the legs down. The knees will lower over months and years of consistent hip opening practice. Pressing them down manually when the hips are tight sends rotational force to the knee. Don’t.
  • Build with Sukhasana, Bhadrasana, and Ardha Padmasana (half Lotus) before attempting full Lotus. These postures develop the hip external rotation gradually.
  • Practice hip openers deliberately: Pigeon Pose, Bhadrasana, Gomukhasana, Ardha Matsyendrasana. The hip flexibility required for Padmasana doesn’t come from sitting in Padmasana when you’re not ready — it comes from systematic hip opening work over time.
  • Alternate which foot goes on top. Most people have a preference. Working both sides equally is practical and prevents asymmetric hip development.

Why Learn with a Yoga Teacher or Instructor

This is one pose where teacher guidance is genuinely protective. Teachers know how to assess hip external rotation readiness and can tell immediately whether the rotation is coming from the hip (correct) or the knee (injurious). They’ll prescribe the appropriate preparatory postures and can set a realistic timeline — which is usually measured in months and years, not sessions.

For students who have already developed Padmasana, a teacher can refine the spinal alignment and mudra position that makes the pose useful for meditation and pranayama practice rather than just a shape held for its own sake.

Cautions and Contraindications

  • Knee injuries of any kind: Padmasana applies rotational and compressive force to the knee joint. Active knee conditions are a contraindication. Even after recovery, build back slowly with half Lotus before attempting the full pose.
  • Hip pathology (labral tears, FAI): The extreme hip external rotation required may be contraindicated with certain hip joint conditions. Get clearance from an orthopedic specialist.
  • Ankle injuries: The sustained plantar flexion of the foot on the thigh may be uncomfortable with ankle pathology. Monitor carefully.
  • Sciatic nerve irritation: Some presentations of sciatica are aggravated by the hip external rotation. Monitor and stop if symptoms worsen.

Conclusion

Padmasana is worth working toward — slowly, patiently, with proper hip preparation. The meditation seat it eventually provides is genuinely different from simpler cross-legged positions. The hip mobility it develops over years of consistent practice has value that extends well beyond the pose itself.

But knee injuries from rushing it are not worth the shortcut. The hips open at their own pace. Work with that pace, not against it. The lotus will come when it comes.

FAQS

Q: Is Padmasana necessary for meditation?

A: No. It’s traditional, but many experienced meditators use Sukhasana (easy pose), Siddhasana, or even a chair. Meditation quality has nothing to do with whether your feet are in lotus position.

Q: Can I force myself into Padmasana?

A: Absolutely not. Forcing lotus without hip flexibility is a reliable way to injure the knee. The hip needs to externally rotate for the pose to work safely.

Q: How do I work toward Padmasana safely?

A: Hip-openers over time — Gomukhasana, Baddha Konasana, Pigeon Pose. It can take months to years. There’s no shortcut.

Q: Who should never attempt Padmasana?

A: Anyone with knee injuries, hip replacements, or limited hip external rotation. The knee is not designed to carry the rotation that tight hips transfer to it.

Q: Is half lotus (Ardha Padmasana) a safer alternative?

A: Yes — it requires less hip rotation and carries less risk to the knee.

Q: How long should I sit in Padmasana?

A: Depends on your comfort. 10 to 30 minutes is common for meditation. Come out if you feel any knee strain.

READ MORE
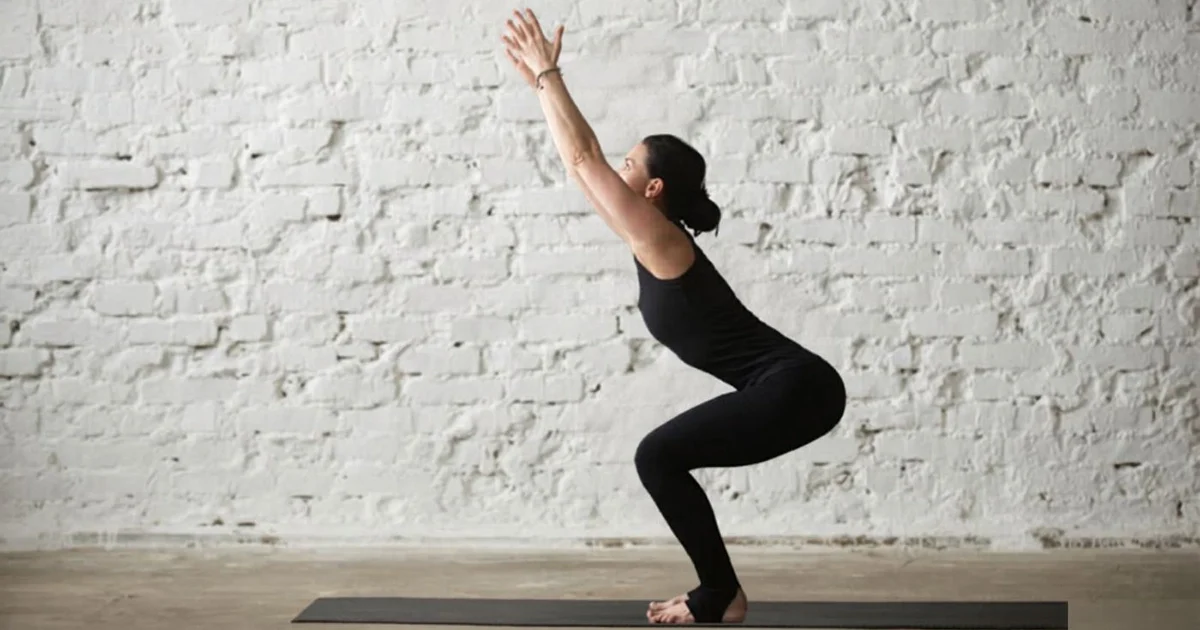
A yoga practitioner keeping their spine long and weight back in their heels while practicing proper alignment in Utkatasana.
BlogLife StyleTrendingYoga
March 9, 2026By bharatyogas0 Comments

Utkatasana-Chair Pose

Utkatasana (Chair Pose) The Pose That Humbles Everyone

Table of Contents

  1. Introduction
  2. How to Do Utkatasana
  3. Benefits
  4. Tips for Better Practice
  5. Why Learn with a Yoga Teacher or Instructor
  6. Cautions and Contraindications
  7. Conclusion
  8. FAQS

Introduction

Nobody looks forward to Utkatasana the way they look forward to, say, Child’s Pose. It’s uncomfortable in the way that real work is uncomfortable — thighs burning, torso leaning, arms getting heavy. Most beginners hold it for about 15 seconds before straightening their legs. Experienced practitioners hold it for a minute and still find it hard.

Utkata means fierce, powerful, or intense. The name is honest. This is a fierce posture — a squat-like shape that demands simultaneous strength from the quadriceps, glutes, and core while asking the spine to lengthen upward and the arms to reach overhead. Several things happening at once, none of them easy.

Despite the discomfort (or because of it), Utkatasana is one of yoga’s more functionally useful poses. The squat pattern it trains is one of the most basic movement patterns the body uses — sitting down, standing up, picking things up, climbing. The strength it builds is practical in the literal sense.

How to Do Utkatasana

Stand in Tadasana with feet together or hip-width apart, depending on your balance and ankle flexibility. Inhale and raise both arms overhead — palms facing each other, arms alongside the ears, or hands pressed together in prayer position.

On the exhale, bend the knees and sink the hips as if sitting back into a chair. The knees track over the second toe. The weight is in the heels and the mid-foot. The torso leans forward slightly — this is unavoidable and correct — but the spine stays long rather than collapsing.

The hips aim toward the height of the knees in the full expression; most beginners will find a more shallow squat position that still creates significant quadriceps demand.

Arms stay active: reaching upward, shoulders drawing away from the ears. The tendency is for the arms to droop as the legs get tired. Keep them lifted.

Hold for 30 to 60 seconds, breathing steadily. Rise on an inhale and return to Tadasana.

Benefits

Quadriceps and glute strengthening. The sustained hold in the squat position builds the quadriceps and glutes under time-under-tension. This is functional strength — the same muscle engagement used every time you sit down, stand up, or squat to pick something up. Utkatasana builds it without any equipment.

Core engagement. The torso leaning forward at the slight forward angle of the pose requires constant core engagement to prevent the lower back from collapsing. The deep stabilizers of the lumbar spine work throughout the hold.

Ankle and foot strengthening. The weight distribution in Utkatasana activates the intrinsic muscles of the feet and the muscles of the lower leg in ways that flat-foot standing doesn’t. Regular practice improves ankle stability.

Shoulder endurance. Holding the arms overhead against gravity for 30 to 60 seconds is isometric work for the shoulder stabilizers and upper trapezius. This builds endurance in the overhead position that transfers to everyday reaching and lifting tasks.

Heat and cardiovascular activation. Utkatasana generates more metabolic heat than most yoga postures. Practitioners notice their heart rate rising and their body temperature increasing during sustained holds. This makes it a useful warm-up component and cardiovascular contribution in yoga sequences.

Tips for Better Practice

  • Sit back and down, not just down. The hips should move backward as they lower, keeping the weight in the heels rather than rolling forward onto the toes. If the heels lift, the hips aren’t going back enough.
  • Track the knees over the second toe. They tend to fall inward (valgus collapse), particularly as the legs fatigue. This is the most common form breakdown in Utkatasana and the one most associated with knee discomfort.
  • Keep the spine long. The forward lean of the torso is fine and anatomically correct — you can’t squat with an upright torso without lifting the heels. But within that forward lean, the back should be flat, not rounded.
  • Breathe consistently. The quadriceps burn makes breath-holding tempting. Steady breathing manages the discomfort better than bracing.
  • Engage the inner thighs. A slight squeeze of the inner thighs (as if holding a block between the knees) helps stabilize the knee tracking and activates additional muscle groups.

Why Learn with a Yoga Teacher or Instructor

Knee tracking is the most important alignment point in Utkatasana and the hardest to self-monitor during the hold when the legs are already fatiguing. A teacher watching can see the valgus collapse before the practitioner feels it and can cue the correction before it becomes a habitual pattern.

Teachers also help with the weight distribution — heel vs. toe balance — and the torso position, making sure the lean is coming from the correct hip-hinge pattern rather than a rounding of the lower back.

Cautions and Contraindications

  • Knee injuries: The sustained squat position loads the patellofemoral joint. Those with kneecap tracking problems, meniscal tears, or post-surgical knees should approach with caution and keep the knee bend minimal.
  • Low back pain: Maintaining the spinal length while leaning forward is demanding. Those with acute lower back problems may find the pose aggravating.
  • Shoulder injuries: Overhead arm position may be inappropriate with rotator cuff pathology. Modify with hands on the hips instead.
  • High blood pressure or heart conditions: The cardiovascular demand is real. Monitor and keep holds shorter.

Conclusion

Utkatasana is the pose nobody enjoys and everyone needs. The functional squat strength it builds, the balance it demands, the heat it generates — these things are practically useful in daily movement in ways that many prettier yoga poses aren’t.

Hold it longer than you want to. That’s where the work happens. And the discomfort, when you breathe through it and keep the form, becomes something you can work with rather than just suffer through.

FAQS

Q: Is Utkatasana good for building leg strength?

A: Yes — it’s one of the more effective leg strengthening poses in yoga. Quadriceps, glutes, and calves all work hard, especially in longer holds.

Q: My heels lift in Chair Pose. Is that okay?

A: Not ideal — try to keep both heels grounded. Lifting heels often means you’re leaning too far forward. Shift the weight back slightly.

Q: How long should I hold Utkatasana?

A: 30 to 60 seconds. It burns. That’s the point.

Q: My lower back hurts in Utkatasana. What’s wrong?

A: Usually either arching too much at the lumbar or not engaging the core. Keep a slight tuck and lengthen the tailbone down.

Q: Can I use a wall for support in Chair Pose?

A: Yes — placing your back against a wall is a good way to learn the alignment before doing it freestanding.

Q: Who should be careful with Utkatasana?

A: People with knee injuries, especially patellofemoral issues. Make sure your knees track over your toes, not caving inward.

READ MORE
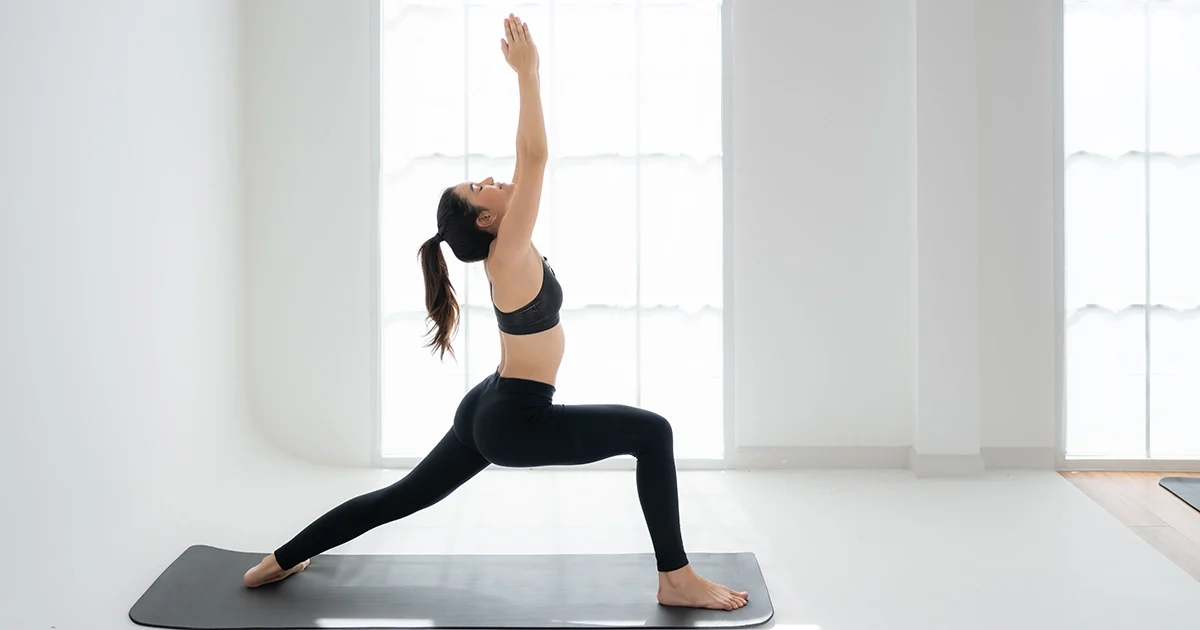
A yoga practitioner keeping level hips and proper knee tracking while demonstrating stable alignment in Virabhadrasana I.
BlogLife StyleTrendingYoga
March 8, 2026By bharatyogas0 Comments

Virabhadrasana 1 -Warrior Pose 1

Virabhadrasana I (Warrior I) Power, Stability, and the Hip That Won't Cooperate

Table of Contents

  1. Introduction
  2. How to Do Virabhadrasana I
  3. Benefits
  4. Tips for Better Practice
  5. Why Learn with a Yoga Teacher or Instructor
  6. Cautions and Contraindications
  7. Conclusion
  8. FAQS

Introduction

The three Warrior poses are among the most practiced and most misaligned postures in yoga. Virabhadrasana I is the first, and probably the most technically demanding of the three despite appearing in most beginner sequences.

Virabhadra was a powerful warrior figure in Hindu mythology, created by Shiva. The three poses named after him are meant to embody different aspects of that power. Warrior I is the most frontal — both hips squared toward the front, arms reaching overhead, the whole body directed forward like an arrow.

That “both hips squared forward” instruction is exactly where the trouble starts. The rear leg and its hip don’t square easily. The hip flexors on the back leg are stretched in the lunge position, and if they’re tight — which they almost always are — they pull that hip backward rather than letting it rotate forward to square with the front. Most practitioners in Warrior I have one hip forward and one hip pulled back, and they don’t realize it.

Getting genuinely square is harder than most people think. It’s also the detail that makes the pose what it’s supposed to be.

How to Do Virabhadrasana I

Step one foot back about 3.5 to 4 feet. Angle the back foot to approximately 45 to 60 degrees (not perpendicular to the front foot, which is Warrior II’s position). The front foot points straight forward.

Bend the front knee directly over the ankle — shin vertical, knee tracking over the second toe.

Now: rotate the back hip forward. Press the back heel firmly into the floor. Square the hips toward the front as much as the hip flexors allow. There will likely be a gap — the back hip will not come all the way forward to match the front. That’s fine. Work toward squaring; don’t force it.

Inhale and raise both arms overhead, palms facing each other or pressed together. The torso lifts and faces forward. The front knee bends deeper. The back leg stays straight and active.

Hold for 30 to 45 seconds. To come out, lower the arms, straighten the front leg, step forward, and repeat on the other side.

Benefits

Hip flexor stretch (back leg). The lunge position combined with the hip-squaring effort creates a significant stretch in the hip flexors of the back leg — particularly the iliopsoas and rectus femoris. For most adults, this is one of the areas of most desperate need.

Quadriceps and glute strengthening (front leg). The bent front knee holding the lunge position builds functional strength in the quadriceps and glutes under sustained load. The hold time is what generates the strength benefit.

Shoulder and thoracic opening. Arms raised overhead with the chest lifted and the thoracic spine extending creates a useful opening through the anterior shoulder and upper chest. The upright orientation makes this more accessible than similar arm positions in supine backbends.

Balance and stability. The wide-legged asymmetric stance challenges balance in the frontal and sagittal planes simultaneously. The ankle, knee, and hip stabilizers of the front leg work continuously to maintain position.

Core engagement. Keeping the torso upright and facing forward in the lunge position — resisting the tendency to lean forward into the front knee — requires significant core engagement. The lumbar erectors and abdominals both work.

Tips for Better Practice

  • Shorten the stance if the back heel can’t stay on the floor. A shorter stance is better than a longer one where the heel lifts, which compromises the hip-squaring work and the back-leg hip flexor stretch.
  • Work the hip squaring actively. Place both hands on the hips and physically push the back hip forward before raising the arms. Feel the difference that makes in the stretch along the front of the back-leg hip. That sensation — the increase in hip flexor stretch — is the goal.
  • Track the front knee. It tends to collapse inward as the pose progresses, especially when arms go overhead and the focus shifts upward. Keep the knee over the second toe.
  • Lift through the arms rather than dumping into the shoulders. The shoulders want to creep toward the ears as the arms rise. Counter this by deliberately drawing the shoulder blades down and back while reaching the hands upward.

Why Learn with a Yoga Teacher or Instructor

The hip squaring is the technical heart of Warrior I, and it’s both the hardest part to achieve and the hardest to self-assess. A teacher standing behind the student can see immediately whether the back hip is squared, and can place a hand on the back hip and guide it forward, giving physical feedback about the direction the movement should go.

Teachers also watch knee tracking in the front leg and the relationship between the torso lean and the arm position — details that are easy to miss when the student is focused on maintaining the lunge itself.

Cautions and Contraindications

  • Hip flexor strain: Warrior I stretches the hip flexors significantly. Rest active strains.
  • Knee pain in the front leg: Check the knee tracking. Valgus collapse (knee falling inward) and anterior knee pain are often related. Reduce the depth of the bend if pain persists with correct alignment.
  • Lower back pain: The extension of the lumbar spine in the upright torso position can aggravate certain back conditions. Tuck the tailbone slightly and engage the core to reduce lumbar extension.
  • Ankle instability: The rear foot at 45 degrees creates a somewhat unstable ankle position. Practice near a wall if ankle injuries are present.

Conclusion

Warrior I is not a simple pose. The hip squaring, the front knee alignment, the arm reach, the core work — it’s a lot happening simultaneously, and most of it is happening in the places the body is least flexible and least strong.

That’s exactly why it’s worth practicing. Consistently, with attention to the hip squaring rather than just the shape, it builds real functional strength and hip flexibility over time. The warrior’s power is in the specificity of the work, not in looking like the pose.

FAQS

Q: Why is Warrior 1 so hard to hold?

A: It requires hip flexor flexibility, shoulder mobility, and leg strength all at once. If any of those is limited, it becomes uncomfortable quickly.

Q: My back heel keeps lifting in Warrior 1. What do I do?

A: This usually means the stance is too wide, or your hip flexors are tight. Shorten your stance or turn the back foot in more.

Q: What does Warrior 1 strengthen?

A: Front leg (quads, glutes), core, and the back leg through active grounding.

Q: How long should I hold Warrior 1?

A: 30 to 60 seconds per side.

Q: Should both hips face forward in Warrior 1?

A: That’s the goal, though tight hip flexors make it challenging. Square the hips as much as your body allows without forcing.

Q: Who should be cautious with Virabhadrasana 1?

A: People with knee or hip injuries, or high blood pressure. Arms lifted overhead can increase blood pressure temporarily.

READ MORE
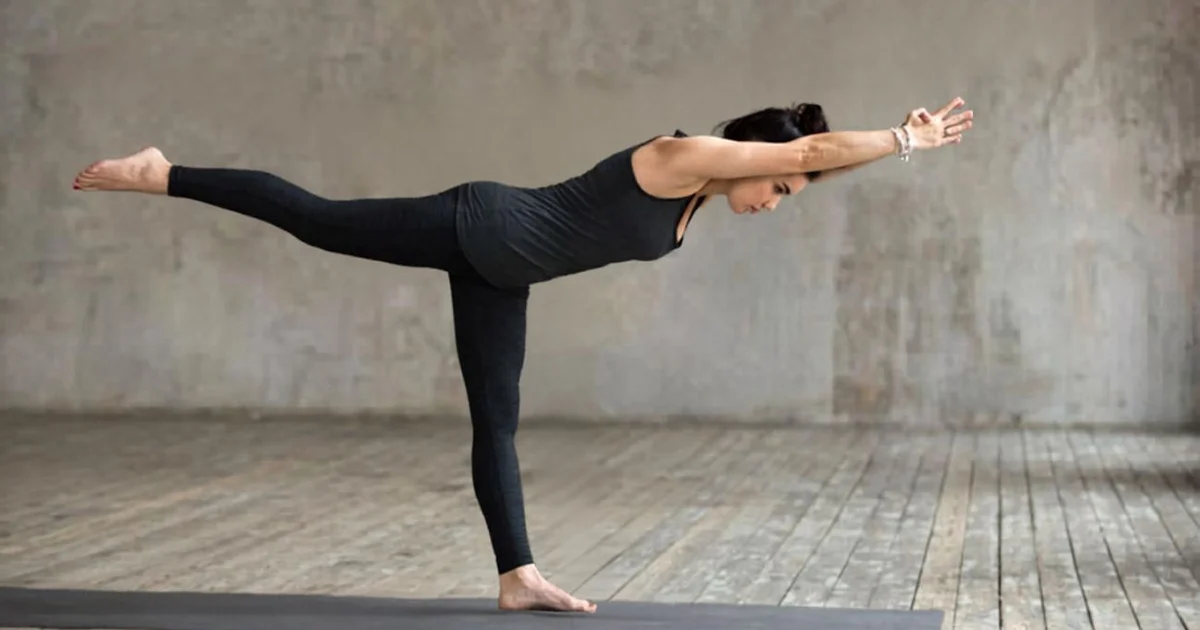
A yoga practitioner keeping a level pelvis and long spine while holding proper alignment in Virabhadrasana III.
BlogLife StyleTrendingYoga
March 7, 2026By bharatyogas0 Comments

Virabhadrasana 3-Warrior Pose 3

Virabhadrasana III (Warrior III) One-Leg Balance Taken to Its Logical Extreme

Table of Contents

  1. Introduction
  2. How to Do Virabhadrasana III
  3. Benefits
  4. Tips for Better Practice
  5. Why Learn with a Yoga Teacher or Instructor
  6. Cautions and Contraindications
  7. Conclusion
  8. FAQS

Introduction

Warrior III is the pose that makes the other Warriors look simple. The body balances on one leg with the torso and the lifted leg forming one horizontal line, parallel to the floor. Arms extend forward. Everything is airborne except one foot.

The challenge is managing. Strength, balance, flexibility, concentration, body awareness — Warrior III asks for all of them simultaneously. And unlike poses where one quality can compensate for another, here every piece needs to be reasonably developed. You can’t balance your way out of weak glutes, or strength your way through poor hip flexor flexibility, or concentrate your way past an unstable ankle.

That integration is what makes Warrior III worth working toward. It’s also why it’s typically introduced in intermediate rather than beginner practice.

How to Do Virabhadrasana III

Begin in Warrior I or in Tadasana. If entering from Tadasana: stand on the right foot, fix the gaze on a single non-moving point (drishti), and begin to hinge forward from the right hip while simultaneously lifting the left leg behind you.

The torso and left leg rise and lower together — it’s a see-saw motion from the right hip joint. The arms can extend forward alongside the ears, press back alongside the body (easier for balance), reach wide to the sides like airplane wings, or come to prayer at the heart (easiest for balance).

The goal is one long horizontal line: left heel, left hip, right hip, torso, crown of head — all at the same height, parallel to the floor. The right knee is soft, not locked. The right hip is directly over the right foot.

Hold for 20 to 45 seconds. To come out, lower the back leg with control, returning to Warrior I or Tadasana. Repeat on the other side.

Benefits

Single-leg balance and stability. The full body weight on one leg, with the rest of the body horizontal, is a significant balance challenge. The ankle, knee, and hip stabilizers of the standing leg work hard throughout the hold. This is the kind of balance training that has real functional relevance — it trains the same stability needed for walking, running, and any one-leg movement.

Hamstring and hip flexor balance. The lifted leg requires the glutes to lift and the hip flexors to lengthen. Getting the leg to horizontal (rather than 30 or 45 degrees) requires genuine hamstring flexibility in the standing leg and hip flexor flexibility in the lifted leg.

Core and spinal stability. Holding the torso horizontal while the leg pulls it down requires the core and spinal erectors to maintain a stable, neutral spine. This is functional core work in a position that most conventional exercises don’t replicate.

Posterior chain strengthening. The glutes of the lifted leg, the hamstrings, the spinal extensors — all work to maintain the horizontal position of the back leg against gravity.

Concentration. Warrior III requires and develops concentration in the way that balance poses do: direct, immediate, and honest. The mind wanders; the body follows. This is useful feedback and useful training.

Tips for Better Practice

  • Use a drishti (fixed gaze point) immediately. Without it, balance is significantly harder. A spot on the floor about four feet ahead works well.
  • Hinge from the standing hip, don’t just lean forward. The movement is a seesaw from the hip joint — torso and back leg rising together from the hip hinge. This keeps the spine long rather than rounding.
  • Keep the lifted hip square with the floor. The hip of the lifted leg tends to open toward the ceiling (external rotation). Keep it down, hip bones facing the floor.
  • Use a wall for the back foot initially. Stand facing away from the wall at arm’s length, hinge forward, and press the lifted foot against the wall. This gives enough support to work the balance and alignment without the full wobble.
  • Breathe. The concentration demand of balance poses makes breath-holding common. Keep breathing — it actually helps the balance by keeping the core active.

Why Learn with a Yoga Teacher or Instructor

Warrior III has several alignment details that are genuinely difficult to self-monitor while also managing the balance. The lifted hip rotation, the spinal length in the horizontal position, the arms-to-ears versus arms-back modification question — these all benefit from external observation.

Teachers will also introduce the appropriate props — the wall, a chair, blocks — that allow students to work the alignment without fighting the full balance challenge, which is the correct sequence for learning the pose well.

Cautions and Contraindications

  • Ankle instability: The single-leg balance on an unstable ankle is risky. Work with wall support until the ankle is adequately stable.
  • Lower back pain: The horizontal torso position can load the lower back significantly, particularly if the core isn’t managing the demand well. Reduce the duration of hold and prioritize spinal length over leg height.
  • High blood pressure: Not typically a contraindication, but the cardiovascular demand in balance poses can be higher than expected. Monitor.
  • Knee hyperextension: The standing knee shouldn’t lock into hyperextension. Keep it soft throughout.

Conclusion

Warrior III is yoga’s most honest integration pose. You can’t fake it — the wobble is immediate and clear if any piece is missing. But when the balance, the strength, the flexibility, and the focus are all genuinely present, the pose has a quality of completeness — body unified around a single axis — that’s different from almost anything else.

Getting there takes time. Working toward it consistently is its own kind of valuable, separate from whether the final pose is ever fully achieved.

FAQS

Q: How do I keep my balance in Warrior 3? A: Fix your gaze on one unmoving point. Engage the standing leg fully, flex the raised foot, and think about reaching both ends of the body in opposite directions.

Q: My standing leg shakes in Warrior 3. Is that okay? A: Yes. Balancing in Warrior 3 is hard. Shaking means the stabilizers are working. It gets steadier with practice.

Q: What is Warrior 3 good for? A: Balance, single-leg strength, hip stability, and core control. It’s also a practical pose — the strength patterns transfer to everyday activities.

Q: Should my torso be fully horizontal in Warrior 3? A: That’s the complete expression, but a 45-degree angle is a good starting point while you build strength and balance.

Q: Can people with lower back problems do Warrior 3? A: Often yes — it strengthens the glutes and core in a way that supports the lower back. But if there’s acute pain, ease in carefully.

Q: How long should I hold Warrior 3? A: 20 to 40 seconds per side. It’s demanding — quality of form matters more than time.

READ MORE
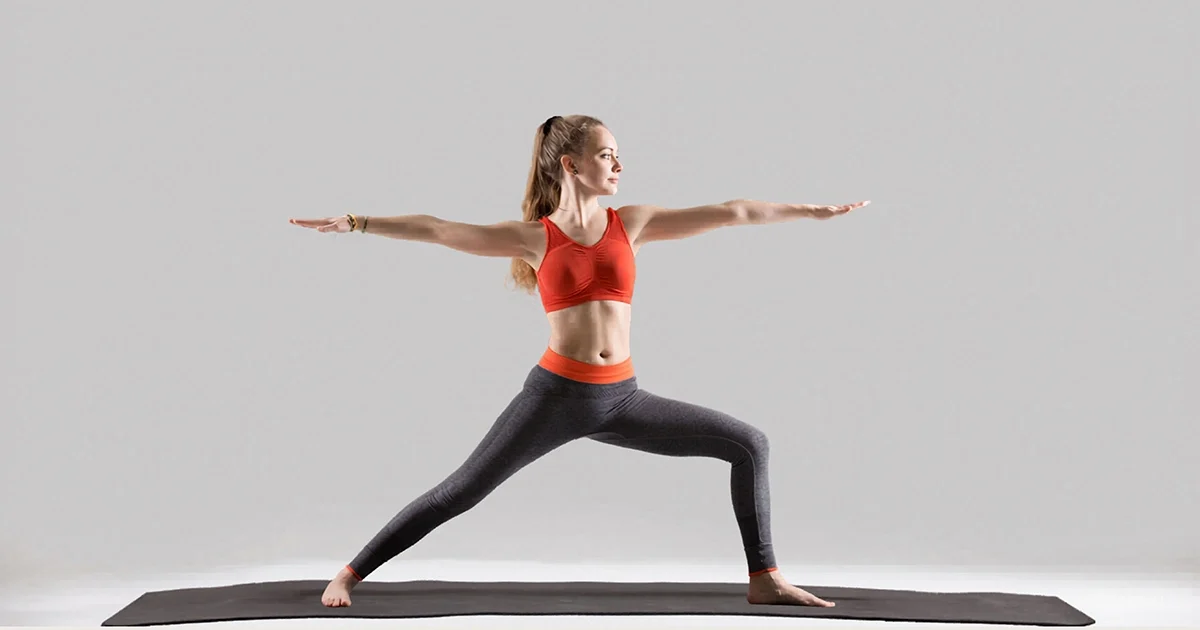
A yoga practitioner keeping their shoulders centered above the hips and front knee aligned over the ankle in Virabhadrasana II.
BlogLife StyleTrendingYoga
March 5, 2026By bharatyogas0 Comments

Virabhadrasana 2 – Warrior Pose 2

Virabhadrasana II (Warrior II) The Open Stance That Requires More Than It Shows

Table of Contents

  1. Introduction
  2. How to Do Virabhadrasana II
  3. Benefits
  4. Tips for Better Practice
  5. Why Learn with a Yoga Teacher or Instructor
  6. Cautions and Contraindications
  7. Conclusion
  8. FAQS

Introduction

If Warrior I faces forward, Warrior II opens sideways. The hips are wide and facing the long side of the mat, the arms extend in opposite directions, the front knee bends while the back leg stays straight. It’s a powerful, grounded shape that many practitioners feel more naturally stable in than Warrior I.

That sense of natural stability can be misleading. There’s actually a lot going on in Warrior II that gets missed when the pose feels comfortable. The front knee tends to collapse inward. The back hip tends to hike up or rotate. The torso leans toward the front leg. The rear leg goes passive. Any one of these compensations reduces what the pose is doing; several of them together make it a fairly passive stretch rather than the strength and stability work it’s meant to be.

Done with genuine attention to all these details simultaneously, Warrior II is demanding in a way that its apparent stability doesn’t suggest.

How to Do Virabhadrasana II

Step the feet wide — roughly 3.5 to 4 feet, depending on height. Turn the right foot out 90 degrees, pointing toward the front of the mat. Turn the left foot in slightly — about 15 degrees.

Bend the right knee, tracking it over the right second toe. Aim for the front thigh to be parallel to the floor; start shallower and build depth over time.

Open the arms wide at shoulder height, right arm forward over the right leg, left arm extending behind. The torso faces the long side of the mat — not angling toward the front leg.

The hips face the side. The chest faces the side. This is different from Warrior I, where everything faces forward.

Gaze over the right fingertips. Settle into the pose. Hold for 30 to 60 seconds. Straighten the front leg and repeat on the left.

Benefits

Front leg quadriceps and glute work. The bent front knee and the sustained hold build significant strength in the quadriceps and glutes. The lateral stance is a different load pattern from squat and forward-lunge work, which makes the strength gains here somewhat distinct.

Hip adductor and abductor work. The wide stance with one hip externally rotated (front) and one neutral (back) creates simultaneous but different demands on the inner and outer thigh muscles of each leg. The adductors and abductors rarely get this kind of bilateral differentiated engagement.

Shoulder and arm endurance. Holding the arms horizontal at shoulder height against gravity is isometric work for the deltoids and rotator cuff. The burn that develops in the shoulders during a long Warrior II hold is real muscular work building real endurance.

Hip flexor stretch (back leg). The back leg, extended and pressed into the floor, gets a hip flexor and inner thigh stretch that becomes more significant the more the front knee bends.

Postural awareness. The lateral opening of Warrior II — chest and hips facing the side, not forward — requires a postural orientation that most daily movement doesn’t use. Developing comfort in this orientation improves overall body awareness and spatial orientation.

Tips for Better Practice

  • Keep the front knee tracking over the second toe throughout. This is the most important alignment point and the one most often lost. As the hold continues and the quadriceps fatigue, the knee tends to fall inward. Keep it out.
  • Don’t let the torso lean forward over the front leg. The trunk should be directly upright, equidistant between the two feet. The forward lean is a compensatory movement for tight hip flexors on the back leg — counter it by pressing the back hip down and keeping the torso vertical.
  • Activate the back leg. The back leg is straight but it shouldn’t be passive. Press into the outer edge of the back foot, engage the back quadriceps, resist the tendency for the back leg to become a passive anchor.
  • Reach through both arms equally. The front arm often gets the attention because the gaze goes over it. Reach the back arm actively — as if trying to touch the back wall — with the same energy.
  • Sink deeper over time, not immediately. The temptation is to go to parallel thigh on day one. A shallower angle with correct alignment builds the strength that makes the deeper angle possible and sustainable later.

Why Learn with a Yoga Teacher or Instructor

Knee tracking and torso verticality are the two things teachers watch most in Warrior II. The knee collapse happens gradually as fatigue sets in, and practitioners often don’t notice until it’s pointed out. The forward lean of the torso is equally invisible from the inside — it feels neutral, but from the teacher’s view it’s clearly compensatory.

Teachers will also cue the back-leg activation and the equality of arm reach — details that significantly change how the pose works but that students tend to forget when managing the more obvious challenge of the bent front leg.

Cautions and Contraindications

  • Front knee tracking problems or knee pain: Reduce the depth of the front knee bend. Correct alignment with a shallower bend is always preferable to deep bend with valgus collapse.
  • Hip problems: The wide lateral stance can aggravate hip impingement or labral pathology. Monitor carefully.
  • Shoulder injuries: Horizontal arm holds may aggravate rotator cuff issues. Modify with hands on hips.
  • Lower back pain: The lumbar position in Warrior II is relatively neutral, making it generally manageable for most back conditions, but monitor and reduce the stance width if needed.

Conclusion

Warrior II is the pose most people think they’re doing well until a teacher or video shows them what’s actually happening. The knee collapse, the forward lean, the passive back leg — these are the small compromises that accumulate into a pose that’s no longer doing what it should.

Doing it correctly is harder and more rewarding than doing it casually. The strength and stability it builds when practiced with genuine attention to all its details is practical, functional, and worth the effort.

FAQS

Q: What’s the difference between Warrior 1 and Warrior 2?

A: In Warrior 2, the arms open to the sides (T-shape) and the gaze goes over the front hand. Hips are open to the side, not squared forward. It’s a different orientation of the body entirely.

Q: My arms get tired holding Warrior 2. Is that normal?

A: Very. The shoulder endurance required for long holds surprises most people. Over time, it improves.

Q: How wide should my stance be in Warrior 2? A: Roughly the length of one of your legs. Your front knee should be over your ankle — not past it.

Q: What does Warrior 2 stretch?

A: The inner thigh and groin of the back leg, hip flexors, and chest.

Q: Should my front thigh be parallel to the floor?

A: That’s the aim, but it’s intensity-dependent. Come to where you’re working but stable.

Q: How long should I hold Warrior 2?

A: 30 to 60 seconds per side.

READ MORE
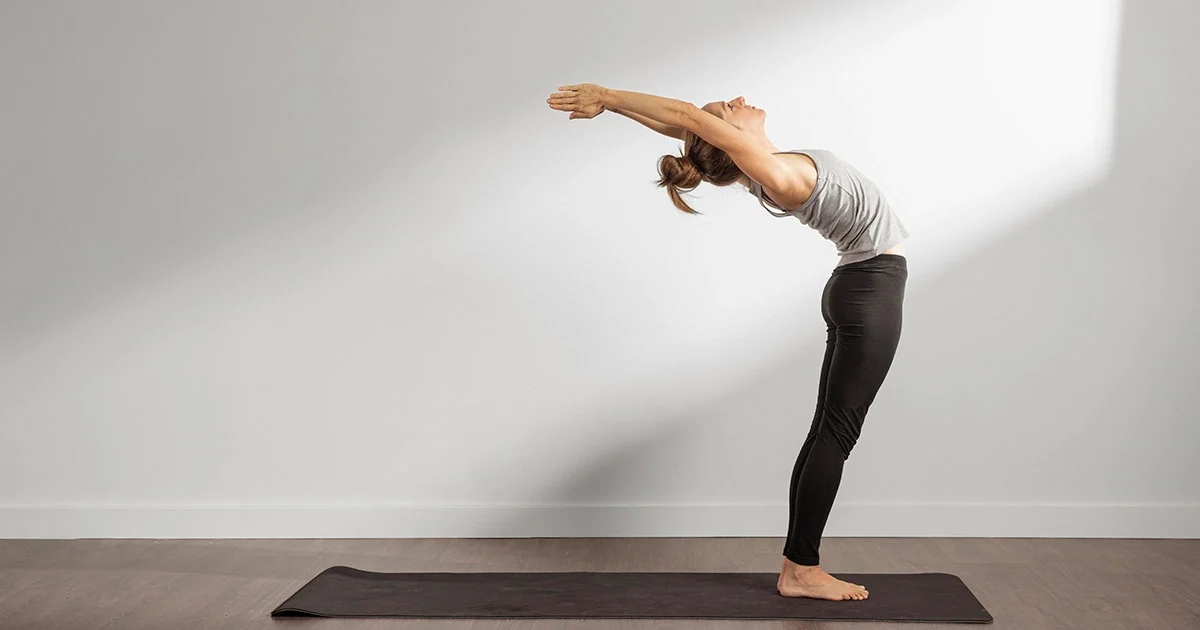
A yoga practitioner demonstrates proper chest extension and safe shoulder alignment in Hasta Uttanasana Raised Arms Pose.
BlogLife StyleTrendingYoga
March 5, 2026By bharatyogas0 Comments

Hasta Uttanasana-Raised Arms Pose

Hastuttanasana (Raised Arms Pose) The Pose That Opens Every Practice

Table of Contents

  1. Introduction
  2. How to Do Hastuttanasana
  3. Benefits
  4. Tips for Better Practice
  5. Why Learn with a Yoga Teacher or Instructor
  6. Cautions and Contraindications
  7. Conclusion
  8. FAQS

Introduction

Hastuttanasana is the pose most people do without knowing its name. It’s the second position in the Sun Salutation — standing, arms raised overhead, a slight backbend through the upper spine, gaze upward. Twelve seconds in the flow, then gone.

Hasta means hand. Uttana means raised or stretched. The pose is exactly what the name says: hands raised, body stretched. Simple, foundational, easy to rush past.

The problem with rushing past it is that, done well, Hastuttanasana is a comprehensive opening sequence in itself — lateral stretch, thoracic extension, shoulder mobility, core elongation, and a mild backbend all at once. Done carelessly, it’s just arms up before the forward fold.

Most people do the careless version. This is worth reconsidering.

How to Do Hastuttanasana

Stand in Tadasana. Check that the foundation is right: feet grounded, thighs engaged, spine long, shoulders down.

Inhale and sweep the arms out to the sides and overhead, bringing the palms together or shoulder-width apart above the head. As the arms rise, allow the chest to lift and the upper spine to gently arc into a backbend. The gaze can follow the hands upward or, if the neck is comfortable, look upward toward the ceiling.

The core stays gently engaged — not braced hard, but present. The lower back should feel a gentle extension, not a sharp compression. If it feels like the ribs are splaying forward excessively, draw them slightly in and feel the backbend shift toward the thoracic spine instead.

Hold for 3 to 5 breaths for a standing practice, or move through it on a single inhale in the Sun Salutation flow.

The lateral variation: with arms overhead, take hold of the right wrist with the left hand and lean to the left. The whole right side of the body stretches — from the hip up through the lateral torso, the armpit, and down the inner right arm. Hold for 3 to 5 breaths, return to center, and lean right to stretch the left side.

Benefits

Lateral body elongation. The overhead arm reach creates length through the whole lateral line of the body — the muscles along the side of the torso, the intercostals, the lateral hip, the shoulder and arm. This lateral stretch is one the body rarely gets in daily movement and one that makes breathing easier by creating space in the ribcage.

Thoracic extension. The gentle backbend component of Hastuttanasana specifically works the thoracic spine in extension when practiced with the emphasis placed there rather than in the lumbar. For people with thoracic stiffness (most people), even this mild, standing thoracic extension has a cumulative opening effect over months of daily practice.

Shoulder mobility. Reaching the arms fully overhead requires flexion at the shoulder joint. Many people don’t have complete shoulder flexion range and compensate by arching the lower back rather than genuinely raising the arms. Working this arm position daily — and noticing where the limitation is — builds overhead shoulder mobility progressively.

Chest and anterior shoulder opening. As the arms rise and the chest lifts, the pectoral muscles and anterior deltoids stretch. The arms-overhead position is one of the few daily movements that accesses this stretch.

Full body integration. Hastuttanasana does something less tangible but real: it creates the felt sense of the whole body moving together upward. The ground connection in the feet, the engagement through the legs, the core support, the chest lift, the arm reach — when done consciously, the pose integrates the body into a single upward intention. This is why it opens Sun Salutations and so many other sequences. It’s a beginning.

Tips for Better Practice

  • Don’t let the ribs splay. The most common error in Hastuttanasana is arching the lower back aggressively while the ribs push forward. This concentrates the backbend in the lumbar while leaving the thoracic spine flat. Draw the front ribs in slightly and feel the extension shift upward.
  • Reach through the fingertips. Not dramatically, but deliberately. The quality of reach through the hands changes the muscular engagement of the whole arm and shoulder.
  • For the lateral version: lean the whole body to the side rather than just bending the torso. The hip can shift slightly to the opposite side to deepen the lateral stretch. The reach through the upper arm is the direction to extend into.
  • Use it as a genuine breath pose. One breath in, arms rise, one breath out, arms lower. The breath coordination teaches the body to pair expansion with inhalation in a way that carries into the rest of the practice.
  • Look up if the neck allows. The cervical extension is mild but real, and it connects the backbend through the whole spine rather than ending it at the shoulders.

Why Learn with a Yoga Teacher or Instructor

The rib-splay pattern — lower back arching while the thoracic stays flat — is one of those things that feels like a full backbend from the inside and clearly isn’t from the outside. Teachers see it immediately and can cue the core engagement that shifts the backbend upward into the thoracic region, which is where it should be in this pose.

For students building toward deeper backbends, a teacher can use Hastuttanasana as a diagnostic and training tool: watching where the arm raising stops being a shoulder and thoracic movement and becomes a lumbar compensatory one is informative about exactly what prep work the deeper backbends need.

Cautions and Contraindications

  • Shoulder impingement: Full overhead arm reach may be painful with shoulder impingement. Modify by reaching forward rather than overhead, or keeping the arms at 45 degrees rather than fully vertical.
  • Cervical disc problems: Skip the head-back component. Keep the gaze forward or slightly upward.
  • Lower back pain with extension: The backbend component may aggravate certain lower back conditions. Reduce the arc and keep the torso more upright.
  • High blood pressure: The overhead arm position transiently increases cardiovascular demand. Keep holds brief.

Conclusion

Hastuttanasana is the pose most people are already doing but not fully inhabiting. The difference between sweeping the arms up casually before the next movement and actually arriving in a conscious full-body stretch — lateral, vertical, and thoracic all at once — is not a small difference.

It’s worth spending a few breaths here. The opening it creates, accumulated over years of daily Sun Salutations, is one of the quieter but more consistent contributions yoga makes to how the body feels.

Start there. With arms raised, chest open, whole body reaching upward. Everything else follows from a good beginning.

FAQS

Q: What is Hastuttanasana?

A: Standing in Tadasana, you raise both arms overhead, sometimes with a slight backbend. It’s the second posture in the Surya Namaskar sequence.

Q: Is it just raising your arms?

A: There’s more going on — the whole body should be engaged, with the spine lengthening, shoulders drawing down (not scrunching), and a gentle lift through the chest.

Q: Can Hastuttanasana help with shoulder stiffness?

A: Yes — reaching overhead opens the shoulder girdle and stretches the sides of the torso. It’s a simple but effective shoulder mobilizer.

Q: Who should avoid the backbend variation?

A: People with lower back injuries or high blood pressure. The arms-only version without the backbend is accessible to almost everyone.

Q: How long should I hold Hastuttanasana?

A: It’s usually a transitional pose in sun salutations (one breath), or held for 20 to 30 seconds as a standalone.

Q: My shoulders bunch up near my ears when I raise my arms. How do I fix it?

A: Actively draw the shoulder blades down before lifting the arms. Think “chest up, shoulders down” as the arms rise.

A yoga practitioner demonstrates relaxing alignment and deep spinal decompression while resting in Balasana.
READ MORE
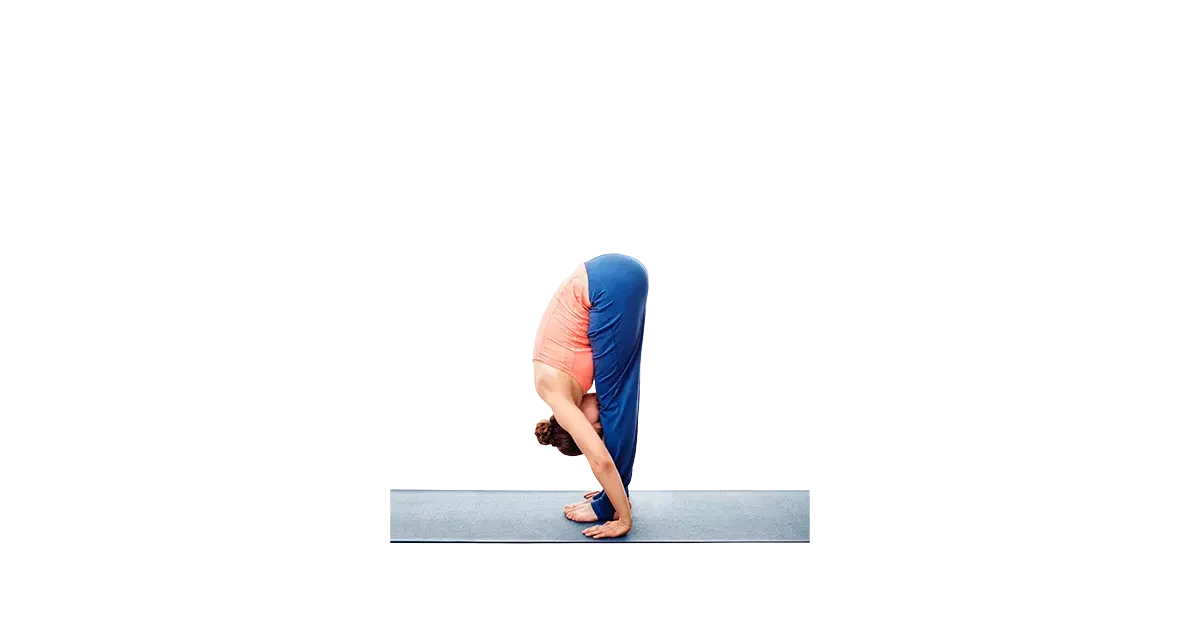
A yoga practitioner keeping a long spine and deeply stretching their legs in Padahastasana Hand-to-Foot Pose.
BlogLife StyleTrendingYoga
March 4, 2026By bharatyogas0 Comments

Padhastasan-Hand to Foot Pose

Padahastasana (Hand-to-Foot Pose) The Forward Fold That Teaches Patience

Table of Contents

  1. Introduction
  2. How to Do Padahastasana
  3. Benefits of Padahastasana
  4. Tips for Better Practice
  5. Why Learn with a Yoga Teacher
  6. Cautions and Contraindications
  7. Conclusion
  8. FAQS

Introduction

Padahastasana is a humbling pose. Most beginners attempt it, find their fingers hovering somewhere around mid-shin, and spend the next six months wondering if their hamstrings will ever actually lengthen.

They will. It just takes longer than people want it to.

Pada means foot, hasta means hand, and asana means posture. The name is descriptive: hands meet feet. But the real substance of the pose isn’t the distance between your hands and the floor — it’s what happens in the spine and hamstrings when you stop forcing the fold and start actually breathing into it.

Standing forward folds are among the most commonly practiced yoga postures and also among the most commonly practiced badly. Understanding what this pose is actually asking for changes how it feels, how it progresses, and how much it benefits you.

How to Do Padahastasana

Stand in Tadasana with feet hip-width apart or together. Inhale and lengthen the spine — reach the crown of the head up, creating length before any movement downward.

Exhale and hinge forward from the hip joints. This is the single most important instruction: the fold initiates at the hip crease, not at the lower back. Hinging from the waist rounds the spine; hinging from the hip keeps the back long and stretches the hamstrings genuinely.

Let the torso hang down. Bring the hands toward the floor, shins, ankles, or feet — wherever they reach today. If you can grasp the big toes, wrap the first two fingers and thumb around each one. If you can slide the palms under the feet with toes over the wrists, that’s the full expression of the pose.

Micro-bend the knees if the hamstrings are very tight. A slight bend allows the pelvis to tilt forward, which lengthens the spine more effectively than a straight-legged fold with a rounded back.

Inhale to lengthen the spine; exhale to soften deeper. Don’t pull yourself down — let gravity do the work over multiple breaths. Stay for 30 to 60 seconds. To come up, bend the knees slightly, place hands on hips, and rise with a flat back on an inhale.

Benefits of Padahastasana

Hamstring lengthening. The posterior chain — hamstrings, calves, glutes — receives a thorough, sustained stretch. This is the kind of flexibility work that actually transfers to daily movement: easier bending, less stiffness getting out of a car, better range of motion for most lower-body activity.

Spinal decompression. Hanging the torso forward lets the vertebral column decompress under its own weight. This is particularly good for people who sit for hours. The gentle traction of gravity in a relaxed forward fold does something that no amount of upright sitting achieves.

Abdominal organ compression. The folded position gently compresses the abdominal region, which is traditionally said to support digestive function. Anecdotally, many practitioners find regular forward fold practice reduces bloating and sluggish digestion.

Mild inversion benefits. With the head below the heart, blood flows differently — toward the brain and face. Many people find this mentally refreshing, a physical shift that corresponds to a mental reset.

Wrist stretch. When the palms are tucked under the feet, the wrists flex fully. For keyboard users and phone scrollers — most of us — this countermovement is genuinely therapeutic.

Tips for Better Practice

  • Depth means nothing if the spine is rounded. A flat-backed fold at 45 degrees gives the hamstrings a better stretch than a collapsed fold that touches the floor. Prioritize the quality of the hinge over the distance traveled.
  • Let the neck fully release. The head is heavy; letting it hang without holding it up adds significant traction to the cervical spine.
  • Breathe into the back of the body. On each inhale, feel the back ribs expand; on each exhale, let the fold deepen slightly.
  • Progress is measured in months and seasons, not sessions. The hamstrings are slow to change. Consistent, patient practice over a long time produces real results; aggressive forcing produces injury.
  • Don’t bounce. Static, sustained holds are what actually lengthens the muscle.

Why Learn with a Yoga Teacher

The single most important technical point in Padahastasana — hinging from the hip rather than folding from the waist — is genuinely hard to self-correct. A teacher will often place one hand at the hip crease and one on the lower back, guiding the pelvis into the correct tilt. This physical cue communicates more clearly than any verbal instruction.

Teachers also watch for hyperextension of the knees in people who try to “straighten” the legs aggressively, and for the common pattern of pulling down with the arms to force depth rather than using breath and gravity. Both of these habits, left uncorrected, either limit progress or create injury.

Cautions and Contraindications

  • Herniated lumbar disc or sciatica: Forward folds can increase disc pressure or aggravate sciatic nerve irritation. Get clearance from a physiotherapist before practicing.
  • Glaucoma and retinal conditions: Head-below-heart positions increase intraocular pressure. If you have eye conditions, check with an ophthalmologist.
  • High blood pressure: The inversion component may not be appropriate. Keep holds short and come up slowly.
  • Hamstring tears: Rest until healed. Partial hamstring tears are aggravated, not helped, by stretching.
  • Pregnancy: Modify with a wider stance and limited depth. Deep forward folds compress the abdomen in ways that become uncomfortable and inadvisable in later trimesters.

Conclusion

Padahastasana teaches something that’s genuinely hard to learn: how to work toward something without forcing it. The hamstrings don’t respond to aggression. The spine doesn’t lengthen when braced against. The pose opens when you stop trying to make it open and instead create the right conditions — breath, patience, correct alignment — and let it happen.

That’s a lesson that extends well beyond yoga.

Note:

FAQS

Q: My hands don’t reach my feet. Should I force them? A: No. Bend your knees as much as you need. Forcing a flat-leg forward bend with a rounded back does more harm than good.

Q: What’s the difference between Padahastasana and just touching your toes? A: In Padahastasana, you slide your hands under your feet, palms facing up. The traction on your wrists and the grip helps you fold deeper with a longer spine.

Q: Is this pose good for back pain? A: For some people, yes — it decompresses the spine. For others with disc issues, deep forward bends can aggravate things. If you have a known back problem, check before practicing.

Q: I feel dizzy when I come up from Padahastasana. What’s happening? A: Blood pressure shifts when you go from head-below-heart to standing. Come up slowly, one vertebra at a time.

Q: How long should I stay in Padahastasana? A: 20 to 60 seconds is a normal hold. Breathe normally; don’t hold your breath.

Q: Can children do this pose? A: Kids are usually more flexible and take to it easily. No special concerns for healthy children.

READ MORE
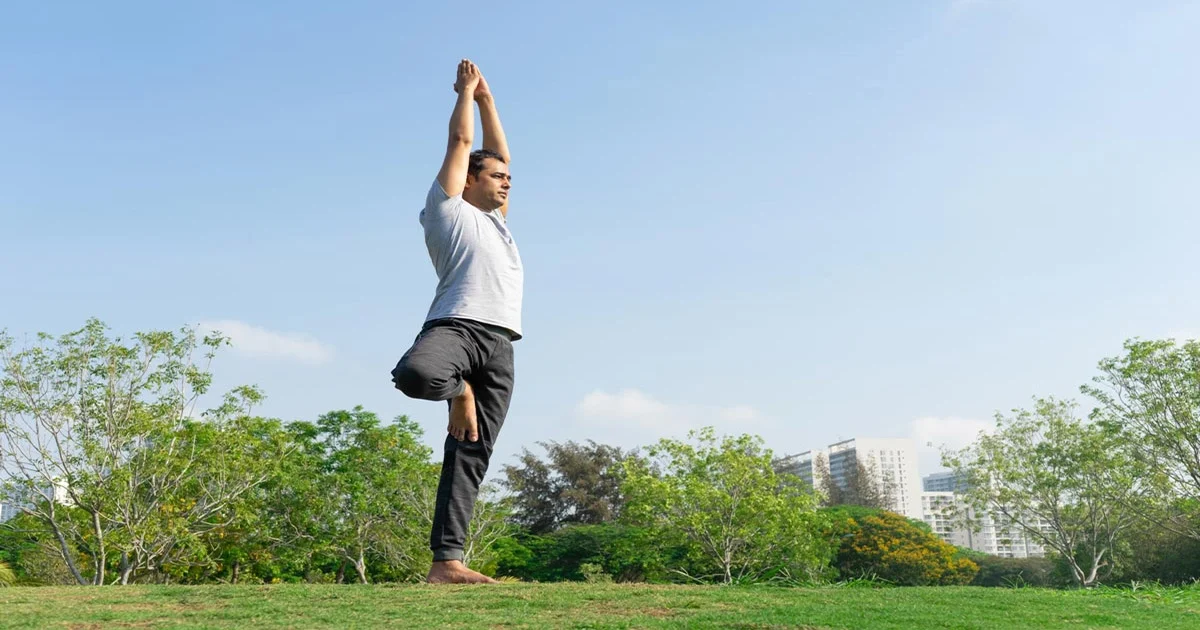
A yoga practitioner keeping proper alignment in Vriksasan Tree Pose by balancing on one leg with arms extended on a mat.
BlogLife StyleTrendingYoga
March 2, 2026By bharatyogas0 Comments

Vrikshasana-Tree Pose

Vrikshasana (Tree Pose) Balance Is a Practice, Not a Talent

Table of Contents

  1. Introduction
  2. How to Do Vrikshasana
  3. Benefits of Vrikshasana
  4. Tips for Better Practice
  5. Why Learn with a Yoga Teacher
  6. Cautions and Contraindications
  7. Conclusion

Introduction

he first time most people attempt Vrikshasana (Tree Pose), they usually wobble, look for a wall, and feel a bit discouraged. However, this initial shakiness is entirely normal. By the twentieth time you step onto your mat, you will naturally begin to understand what this posture is actually trying to teach you about mental and physical stability.

Vrikshasana — vriksha meaning tree, asana meaning posture — is one of the most recognized yoga poses in the world. It’s on logos, retreat posters, wellness apps. Which is part of what makes people underestimate it. A pose this familiar must be simple, right?

Not quite. The balance challenge is real, but it’s also the smaller thing. The bigger thing is what the pose teaches about attention: how quickly the mind wanders, how directly that wandering translates into wobbling, and what it actually takes to stay steady when nothing external is holding you up.

How to Do Vrikshasana

  1. Start in Tadasana. Plant the right foot firmly into the floor. Shift your weight onto it without letting the right hip sway outward.
  2. Bend the left knee and lift the left foot. Place the sole of the left foot on the inner right thigh — above the knee, never on the knee itself. If that’s out of reach today, place it on the inner calf instead. If the calf is also challenging, rest the toes on the floor beside the ankle (a “kickstand” position). None of these is a lesser version; they’re all Vrikshasana, and they all work.
  3. Press the raised foot and the standing thigh into each other. This mutual pressure creates the structural stability of the pose — it’s not passive balance, it’s active engagement between two opposing forces.
  4. Hands can come to Anjali Mudra at the heart or rise overhead. Either way, keep the spine tall. The standing hip should not pop to the side.
  5. Find a focal point (drishti) — a single, still spot at eye level — and rest your gaze there. Breathe slowly. Stay for 30 to 60 seconds, then switch sides.

Benefits of Vrikshasana

Balance and body awareness(proprioception).The stabilizer muscles of the ankle, foot, and lower leg work constantly to make micro-corrections throughout the pose. These muscles rarely get this kind of targeted attention in ordinary exercise, and building them up reduces ankle instability and injury risk over time.

Leg and hip strength. The standing leg works harder than it looks. The hip abductors and external rotators of the raised leg engage to hold the foot against the thigh. Done regularly, Vrikshasana builds functional strength in all of these.

Hip flexor and inner thigh stretch. The raised leg position provides a sustained stretch through the inner thigh and hip flexor of the bent leg. For anyone who sits a lot, this is genuinely useful.

Concentration. This is the one that doesn’t show up in anatomy textbooks but might be the most important benefit. Vrikshasana is live biofeedback for your attention. Mind wanders — body wobbles. Mind returns — body stabilizes. Practicing this daily builds a concrete, embodied experience of concentration that is different from any mental exercise.

Postural awareness. Standing on one leg reveals imbalances between sides tthat two-legged (bilateral) standing hides.. Many people find they’re significantly steadier on one side than the other — useful information for understanding how the body has adapted to habitual patterns.

Tips for Better Practice

  • The wobble is not the enemy. The small corrections your foot makes are the whole point of the pose. Fighting the wobble misses what’s being built.
  • If you consistently fall to the same side, check the standing hip. It’s probably drifting outward — bring it back over the heel.
  • Your gaze point matters more than you’d think. A fixed, still spot makes a significant difference. Try it with eyes closed once you’ve held the pose steadily — the wobble will return immediately.
  • Don’t force the raised foot high on the thigh on day one. The calf or kickstand works. Pushing too hard too soon strains the inner knee.
  • Practice near a wall at first. That’s not cheating. It’s how most people actually learn the pose rather than spending every attempt grabbing furniture.

Why Learn with a Yoga Teacher

Teachers see the standing leg, not just the raised one — and that’s where most of the alignment issues live. The hip drifting, the knee buckling, the torso leaning — these are things a practitioner can’t easily observe from the inside.

Beyond alignment, a teacher can help you work with the mental component of the pose more deliberately. Specific breath and gaze instructions, and understanding why the drishti works, can change the experience completely. It’s also worth having someone check whether your balance asymmetry between sides is significant enough to warrant additional work.

Cautions and Contraindications

  • Ankle or knee injuries: Reduce load on the standing leg with shorter holds and lower placement of the raised foot.
  • Vertigo or inner ear conditions: Practice with a wall or chair for support.
  • High blood pressure: Skip the overhead arm variation, which can raise blood pressure further. Keep hands at heart or sides.
  • Pregnancy: Practice near a wall. Avoid the high thigh foot placement as balance becomes more challenging in later trimesters.

Conclusion

Tree Pose has a deceptive simplicity. People look at it and think they know what it is before they’ve tried it. Then they try it and discover that balance — real balance, the kind that holds under mild pressure — is something that has to be built.

That building happens one second at a time. 30 seconds today, 45 tomorrow, a minute eventually. The wobble shrinks, the steadiness grows, and somewhere along the way the pose stops being about the foot placement and starts being about the attention that holds everything together.

Note:

FAQS

Q: I keep falling out of Vrikshasana. How do I stay balanced?

A: Fix your gaze on one still point at eye level. Wobbling is also fine — balance improves over weeks, not overnight.

Q: Where should I place my foot in tree pose — knee or thigh?

A: Thigh is ideal, but never on the knee joint itself. If your hip is tight, place the foot near the ankle instead. Knee placement is the one spot to genuinely avoid.

Q: Does Vrikshasana strengthen the ankles?

A: Yes, and the standing leg does a lot of quiet stabilizing work. It builds ankle and knee strength over time.

Q: Can I do tree pose if I have a knee injury?

A: Depends on the injury. Keep the foot lower on the leg and avoid pressing outward forcefully. A physio’s opinion is worth having here.

Q: Should both hands be together overhead, or can I keep them at the chest?

A: Either works. Overhead adds a balance challenge. Chest-level is a good starting point if you’re still finding your footing.

Q: How long should I hold Vrikshasana?

A: 30 to 60 seconds per side. Consistency matters more than duration.

READ MORE
  • 1
  • 2
  • 3
  • 4
  • 5
  • 6

Links

About us
Disclaimer
Terms and Conditions
Privacy Policy
Cancellation Policy
Refund Policy

Contacts

Info@bharatyogas.com

Subscribe

    In Socials

    Fb.
    X.
    Ins.
    Lk.

    Bharatyogas

    Copyright © 2026 Bharatyogas.com. All Rights Reserved