logotype
  • Asanas
  • Pranayamas
  • Meditation
  • Blog
  • About Us
  • Contacts
make an appointment
logotype
logotype
  • Asanas
  • Pranayamas
  • Meditation
  • Blog
  • About Us
  • Contacts
Blog001
HomeBlog001
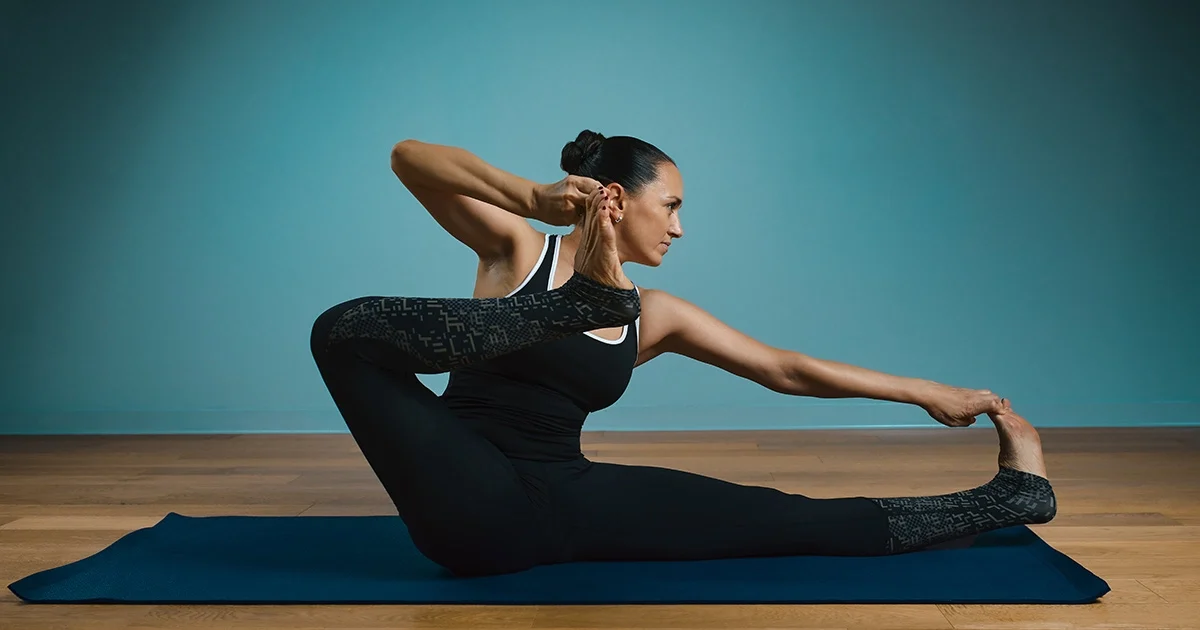
A practitioner demonstrates the correct alignment of Akarna Dhanurasana on a mat by keeping the extended leg flat while drawing the opposite foot toward the ear.
Blog
April 5, 2026By bharatyogas0 Comments

Akarna Dhanurasana-Shooting Bow Pose

Akarna Dhanurasana (Shooting Bow Pose)

Table of Contents

  1. Introduction
  2. How to Do Akarna Dhanurasana
  3. Benefits
  4. Tips for Better Practice
  5. Why Learn with a Yoga Teacher or Instructor
  6. Cautions and Contraindications
  7. Conclusion
  8. FAQS

Introduction

Akarna Dhanurasana is not a posture that most beginners encounter in standard classes, and when they first see it demonstrated, the immediate response is usually something between “that looks complicated” and “my hamstrings will never do that.”

Both observations are fair. The pose is complex, and it does require genuine hamstring and hip flexor flexibility that takes time to develop across most intermediate and advanced yoga postures.

Akarna means toward the ear. Dhanu means bow. The pose creates the shape of a bow being drawn — one leg extended along the floor, the other foot drawn up toward the ear while the hand holds the big toe. The seated position, the extended leg, and the drawn-back foot and arm together create the silhouette of an archer pulling a bowstring to their ear.

It’s primarily an advanced element among classic seated yoga poses, but the preparatory work for it — the hamstring flexibility, the hip external rotation, the arm and shoulder position — are all things worth developing in their own right, and the pose is worth understanding even if the full expression takes months or years to reach.

How to do Shooting Bow Pose with proper alignment

Sit in Dandasana (Staff Pose) with both legs extended. This is the starting position.

Reach forward and take hold of the right big toe with the right hand using the first two fingers and thumb (Yogi Toe Lock). Separately, take hold of the left big toe with the left hand in the same grip.

Keep the left leg extended on the floor. Now bend the right knee and draw the right foot upward and to the right, pulling it toward the right ear. The right elbow bends and lifts as the foot rises. The right knee moves away from the body.

The goal is for the right foot to come level with or near the right ear, the right arm bent at the elbow pulling the foot there like a bowstring drawn back. The torso stays as upright as possible, though a slight tilt toward the extended leg is natural.

Hold for 20 to 30 seconds. Lower the foot, switch sides.

If the foot can’t reach the ear, utilizing specific Shooting Bow Pose preparatory poses for beginners will help create the needed space. Work at whatever height is available — mid-chest, shoulder, whatever the hamstring and hip allow today. Progress comes over time.

Benefits

Hamstring flexibility. Drawing the foot toward the ear while keeping the extended leg on the floor demands extreme hamstring length on the side of the raised leg. This is one of the deepest hamstring stretches in yoga, and reaching it requires months of preparatory practice.

Hip external rotation. As the foot draws upward and outward toward the ear, the hip must externally rotate significantly. This is a different rotation pattern than Baddha Konasana or Padmasana, working the rotators at a higher angle of hip flexion.

Shoulder and arm strength. Holding the foot against the pull of gravity while the elbow lifts requires biceps and shoulder strength. The arm works as a lever, and the sustained isometric hold builds real strength in the arm.

Spinal stability. Keeping the torso from collapsing forward or sideways while the arm pulls the foot toward the ear requires strong spinal stabilizers. The lateral and posterior trunk muscles work throughout.

Concentration. The pose requires simultaneous management of the extended leg staying down, the raised foot being pulled up, the torso staying upright, and the breath continuing. This complexity demands and develops focused attention.

Tips for Better Practice

  • Build the prerequisites first. Paschimottanasana, Janushirsasana, Baddha Konasana, and Supta Padangusthasana (lying supine leg lift with toe hold) are all preparations that develop the hamstring flexibility and hip external rotation needed for Akarna Dhanurasana.
  • Use a strap if the fingers can’t reach the toe easily. Loop a strap around the foot and hold the strap. This allows you to work the raising action without straining to reach.
  • Keep the extended leg flat on the floor. The natural tendency when drawing one foot toward the ear is for the other foot to lift off the floor. Keep pressing the heel of the extended leg down.
  • Work progressively with the height of the raised foot. Mid-calf level this week, mid-thigh next month, shoulder height eventually. Honoring the current limit is what builds toward the full expression safely.

Why Learn with a Yoga Teacher or Instructor

The sequencing of preparatory postures that leads toward Akarna Dhanurasana — and the appropriate pace for that progression — is something an experienced teacher can provide and that’s hard to navigate alone. They’ll also watch for the extended leg lifting (the most common compensation) and for whether the torso tilt is appropriate or excessive.

For practitioners working on the pose as an advanced study, a teacher can identify the specific limiting factors — is it hamstring length, hip external rotation, shoulder strength, or trunk stability? — and tailor the preparatory practice accordingly.

Cautions and Contraindications

  • Hamstring tears or strains: Rest until fully healed. This pose’s hamstring demand is extreme; a recently injured hamstring should not be stretched aggressively.
  • Hip joint pathology (labral tears, FAI): The combination of extreme hip flexion and external rotation may be contraindicated. Get clearance from an orthopedic specialist.
  • Lower back disc problems: The sustained seated spinal position while pulling the leg up can load the lumbar discs asymmetrically. Get physiotherapy guidance.
  • Shoulder injuries: The arm position requires full range of shoulder flexion and elbow bend under load. Rotator cuff or bicep injuries may be aggravated.

Conclusion

Akarna Dhanurasana is a long-game pose. The hamstring flexibility, hip rotation, and arm strength it requires take patient, systematic preparation. Working toward it is worthwhile not just for the pose itself but for the physical capacities its preparation builds — capacities that improve everything else in the practice.

Approach it without urgency. The bow draws fully only when the archer is ready.

FAQS

Q: What is Akarna Dhanurasana?

A: A seated pose where one foot is held near the ear (like drawing a bowstring) while the other leg extends forward. It requires significant hamstring and hip flexor flexibility, plus good shoulder mobility.

Q: Is this an advanced pose?

A: Yes. Don’t attempt it without solid hamstring flexibility, forward bend practice, and hip opening work as a foundation.

Q: What muscles does it stretch?

A: Hamstrings of the extended leg, hip flexors and outer hip of the drawn leg, and the shoulder and side body as you hold and pull the foot up.

Q: Can I use a strap in Akarna Dhanurasana?

A: Absolutely — looping a strap around the foot of the raised leg and pulling it toward the ear is the right way to approach this if direct grip isn’t available yet.

Q: What should I prepare with before attempting this pose?

A: Paschimottanasana, Janushirsasana, Marichyasana, and general hamstring work. The hip and shoulder need to be open enough that the pull isn’t happening from the lower back.

Q: Who should avoid Akarna Dhanurasana?

A: People with hamstring injuries, lower back problems, or shoulder injuries. It’s a demanding combination of flexibility requirements.
READ MORE
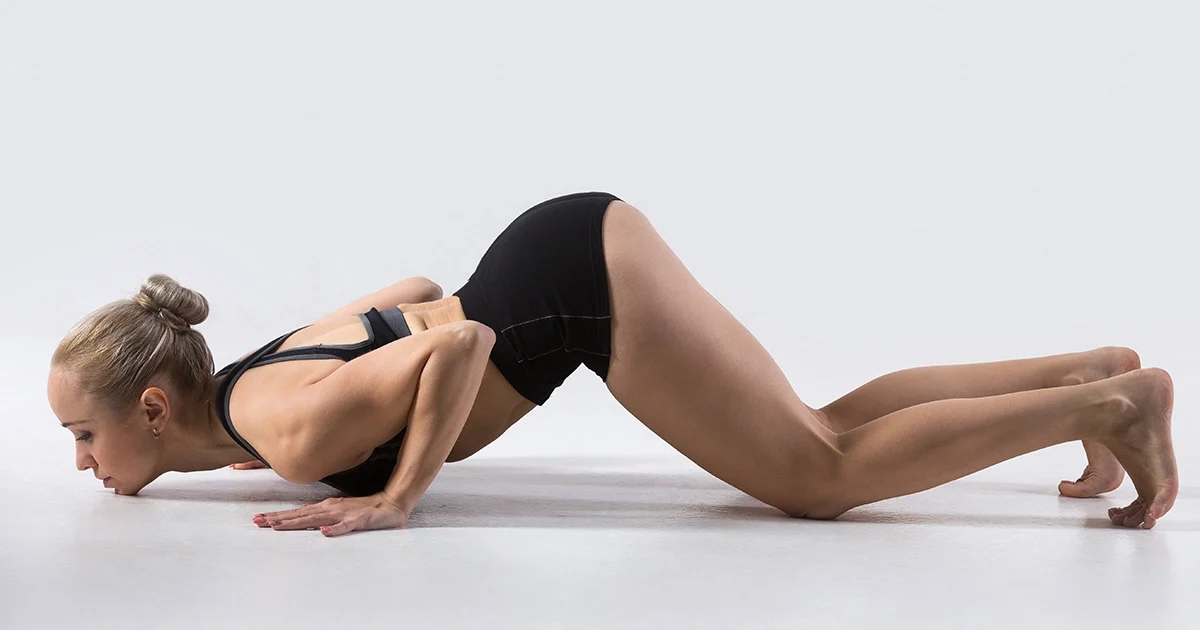
A practitioner demonstrates the correct alignment of Ashtanga Asana on a mat by keeping the hips elevated while the knees, chest, and chin touch the floor.
Blog
April 4, 2026By bharatyogas0 Comments

Ashtanga Asana-Eight-Limbed Pose

Ashtanga Asana (Eight-Limbed Pose)

Table of Contents

  1. Introduction
  2. How to Do Ashtanga Asana
  3. Benefits
  4. Tips for Better Practice
  5. Why Learn with a Yoga Teacher or Instructor
  6. Cautions and Contraindications
  7. Conclusion
  8. FAQS

Introduction

Ashtanga Asana has been replaced by Chaturanga Dandasana in the Sun Salutations of most modern yoga practitioners. The four-limbed staff pose — plank, then lowering to a low push-up position — has become the standard, which has mistakenly turned this traditional shape into mostly a beginner modification.

That framing is somewhat backwards. It is not a less capable version of Chaturanga — it’s a distinct option among traditional hatha yoga poses with a different purpose and different physical demands.

Ashta means eight. Anga means limb. Eight limbs touch the floor: the two feet (or knees), two knees, two hands, the chest, and the chin. The posture creates a specific opening of the chest against the floor while the hips remain lifted, which is distinct from anything that happens in a standard Chaturanga-to-Up-Dog transition.

In the traditional Surya Namaskar B sequence, this is a cornerstone of yoga for beginners, serving as the posture that precedes Bhujangasana. Its value isn’t in what it looks like; it’s in the chest-to-floor contact and the preparatory opening it creates for the Cobra that follows.

How to do Eight Limbed Pose correctly

From Plank Pose or from a kneeling position, bring the knees to the floor. Then lower the chest to the floor, keeping the hips elevated. The chin (or forehead, depending on the tradition) touches the floor.

The eight points of contact: both feet or toes, both knees, both hands, the chest, and the chin. The hips are the highest point — they don’t lower to the floor. The spine creates a gentle curve with the hips at the peak and the chest and chin at the floor.

In some traditions the hands are placed beside the chest with elbows bent and close to the body — the position from which Cobra will rise. In others the hands may be slightly wider.

Hold for 1 to 3 breaths. Transition to Cobra (Bhujangasana) on the next inhale.

If you struggle with alignment or compression in your upper spine, exploring Eight Limbed Pose variations for neck pain—such as resting your forehead down instead of your chin—can provide instant relief.

Benefits

Chest opening and preparatory Cobra setup. The chest resting on the floor in the correct body geometry positions the spine for Bhujangasana. The anterior chest muscles are compressed and the thoracic spine is placed in a mild extension that prepares the body for the deeper extension of Cobra.

Arm and shoulder conditioning. The lowering of the chest from plank to the floor (with hips elevated) requires controlled eccentric work from the triceps and chest muscles. Done slowly, this builds strength in the pushing muscles of the upper body.

Spinal flexibility introduction. For beginners who aren’t yet able to do Chaturanga, Ashtanga Asana provides an entry point into the prone part of the Sun Salutation sequence that maintains spinal mobility work without requiring upper body strength that hasn’t been developed yet.

Thoracic extension awareness. The specific position of chest to floor with hips elevated creates a more acute awareness of thoracic extension than most postures. The practitioner can feel exactly where the sternum is in relation to the floor.

Lower back decompression. With the hips elevated and the chest on the floor, the lumbar spine is in a position that many people find comfortable and relieving, particularly those with anterior disc bulges where extension helps.

Tips for Better Practice

  • Don’t let the hips lower to the floor. The hip elevation is what makes this pose distinct. Sagging the hips turns it into a passive prone rest rather than the specific chest-opening position the pose creates.
  • Keep the elbows close to the ribs. Splaying elbows reduce the chest-to-floor contact and reduce the mechanical advantage for the Cobra transition that follows.
  • Use the chin or forehead depending on neck comfort. Some traditions use chin; others forehead. The forehead option is gentler on the cervical spine, particularly for those with neck sensitivity.
  • Transition into Cobra slowly. The setup that Ashtanga Asana creates works best when the transition to Bhujangasana is unhurried — a slow, controlled lift rather than a quick push.

Why Learn with a Yoga Teacher or Instructor

Teachers help with the transition mechanics between poses in a Sun Salutation sequence — particularly the sequencing from Plank to Ashtanga Asana to Cobra. The nuance of how and why Ashtanga Asana prepares the body for Cobra is something that’s best understood through demonstration and guided practice rather than written description.

For beginners using Ashtanga Asana as a Chaturanga modification, a teacher can ensure the hip elevation is maintained and the chest positioning is appropriate.

Cautions and Contraindications

  • Wrist injuries: The hands bear weight in a moderately flexed position. Use fists if wrist extension is painful.
  • Knee problems: The knees are in contact with the floor and bearing some weight. Use padding and monitor for comfort.
  • Neck injuries: Use the forehead-to-floor variation rather than chin-to-floor to reduce cervical extension.
  • Pregnancy: No prone lying after the first trimester. Skip this posture in prenatal sequences.

Conclusion

Ashtanga Asana deserves more attention than it gets in modern yoga, where Chaturanga has become the default. The specific chest-to-floor, hips-elevated position it creates does something distinct in the Sun Salutation sequence that a Chaturanga doesn’t replace. Understanding why it’s there — and practicing it with the intention it was designed for — adds a dimension to the sequence that disappears when it’s treated as just a beginner’s modification.

Eight points of contact. Every one of them deliberate.

FAQS

Q: What exactly is Ashtanga Namaskara?

A: It’s a transitional pose in Surya Namaskar where eight points touch the floor — the two feet, two knees, chest, two hands, and chin (or forehead in some traditions). The hips stay lifted off the ground.

Q: Is it the same as a push-up?

A: No. In a push-up the whole body lowers together. In Ashtanga Namaskara the knees go down first, then the chest, while the hips remain up. The order matters.

Q: Who uses this pose instead of Chaturanga?

A: Beginners and practitioners who haven’t developed the arm strength for Chaturanga Dandasana. It’s a valid progression — don’t skip it to do Chaturanga badly.

Q: Does it build arm strength?

A: Some, yes — especially the triceps and chest. But it’s primarily a transitional pose rather than a strength-building hold.

Q: Can I always use Ashtanga Namaskara instead of Chaturanga in Sun Salutations?

A: Yes. Use whichever you can do with good form. A clean Ashtanga Namaskara is better than a collapsing Chaturanga.

Q: What are the eight limbs it refers to?

A: The eight points of contact with the floor: two hands, two feet, two knees, the chest, and the chin.

READ MORE
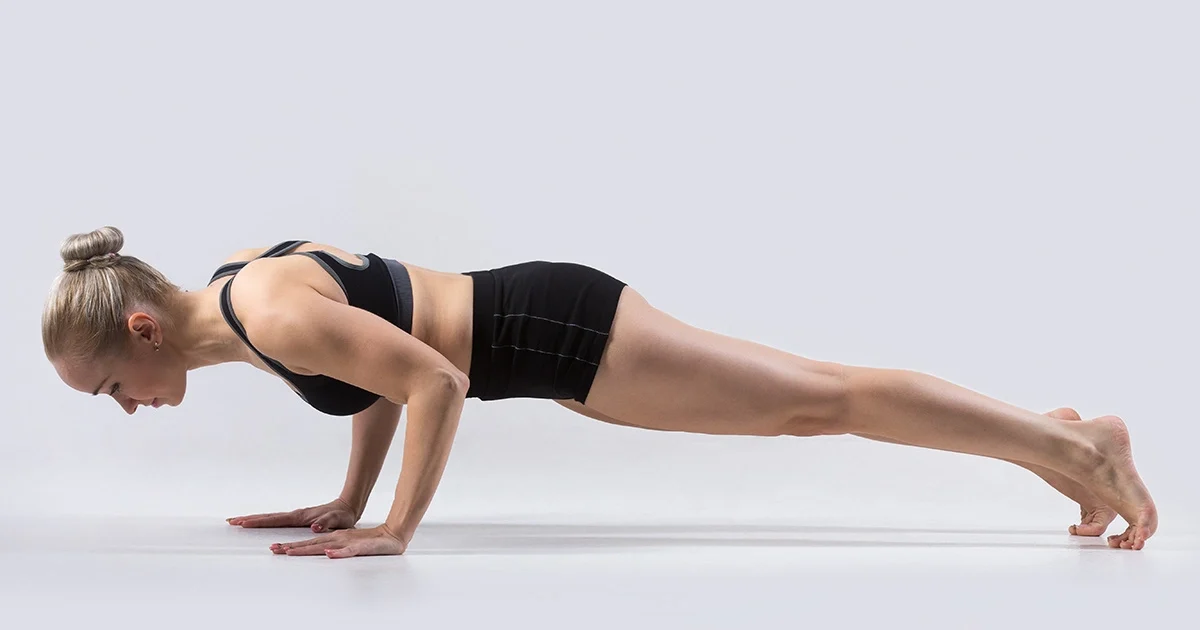
A practitioner demonstrates the correct hover alignment of Chaturanga Dandasana on a blue mat, maintaining the shoulders at elbow height.
Blog
April 3, 2026By bharatyogas0 Comments

Chaturanga Dandasana-Four-Limbed Staff Pose

Chaturanga Dandasana (Four-Limbed Staff Pose)

Table of Contents

  1. Introduction
  2. How to Do Chaturanga Dandasana
  3. Benefits
  4. Tips for Better Practice
  5. Why Learn with a Yoga Teacher or Instructor
  6. Cautions and Contraindications
  7. Conclusion
  8. FAQS

Introduction

Chaturanga Dandasana is the pose that injures more yogis than almost any other in modern practice. That’s not an exaggeration — this challenging shape places a significant load on the shoulders and wrists that most beginners are not yet structurally conditioned to execute safely.

And yet it appears in almost every Sun Salutation. Multiple times per class, every class, from the first session. Nobody warns new practitioners that this addition to standard vinyasa yoga poses requires months of shoulder preparation before it’s safe to do at full load. They just do it, badly, repeatedly, until something hurts.

Chatur means four. Anga means limb. Danda means staff or rod. Four-limbed staff pose: the body as a rigid rod, supported on four points — two hands, two feet — with the arms bent at 90 degrees.

It’s demanding. Done well, it’s one of the most effective ways to develop full-body integration and upper body strength in yoga. Done poorly, it’s a quick route to rotator cuff irritation.

How to do Chaturanga without hurting shoulders

Start in Plank Pose: hands under shoulders, body in one straight line from heels to crown, core engaged.

Lean forward slightly — shift the shoulders a few inches past the wrists so they’re just beyond them rather than directly over.

Bend the elbows, keeping them close to the ribs, and lower the body toward the floor. The elbows track back — not out to the sides. The body remains in one plank-like line throughout the descent. The shoulders are at or above elbow height — they don’t dip below the elbows.

Stop when the upper arms are roughly parallel to the floor. Hold for 1 to 3 breaths. Transition to Up Dog on the next inhale.

The full pose looks like the bottom position of a push-up, but more disciplined: elbows tucked, shoulders above elbows, body in a straight line, face forward.

Benefits

Triceps and pectoral strength. The bending and holding of the arm in this position works the triceps brachii and the pectoralis major under significant load. This is the push-up’s muscular engagement applied to yoga.

Rotator cuff and shoulder stability. The controlled lowering with elbows tracking close to the body requires the rotator cuff — particularly the subscapularis and infraspinatus — to work hard to control the shoulder joint position. When the pose is done correctly and progressively built, it develops shoulder stability that protects against injury.

Core engagement. Holding the plank-like body position while the arms bend requires the core to maintain the straight-line position against gravity. This is the same demand as a plank, made harder by the arm bend.

Wrist conditioning. The hands bear full body weight with the wrists in extension. Regular Chaturanga practice builds wrist and forearm flexor/extensor strength and conditions the wrist joint for more demanding arm balances.

Full body integration. Chaturanga is one of the postures where every part of the body must work together — feet pressing back, legs engaged, core holding, chest forward, elbows tucked, gaze forward. Nothing can be passive. The full-body coordination required develops a kind of integrated body control that transfers to most athletic movements.

Tips for Better Practice

  • Modify until you’re strong enough for the full pose. Dropping the knees to the floor before lowering is not failing Chaturanga. It’s the correct approach to building toward Chaturanga while protecting the shoulders. Most practitioners who jump into full Chaturanga in their first month of practice are loading their shoulders faster than the rotator cuff can adapt.
  • Lean forward before lowering. The shoulder-past-wrists lean is what allows the elbows to track back during the descent rather than flaring out. Without this lean, the elbow-flaring happens mechanically.
  • Elbows track back, not out. This is the instruction that gets lost most frequently. Elbows to the sides is Tricep Pushup; elbows to the ribs is Chaturanga. They’re different and their shoulder loads are different.
  • Keep shoulders above elbow height. If the shoulders dip below the elbows, the rotator cuff is loaded in a position where it has poor mechanical advantage. Stop the descent at or before elbow-height.
  • Build incrementally. Knee-down Chaturanga for a few months. Then full Chaturanga with limited repetitions. Then build volume slowly over more months.

Why Learn with a Yoga Teacher or Instructor

Chaturanga is the pose where teacher guidance is most protective and most commonly absent. Many yoga classes simply include it in a Sun Salutation flow without ever stopping to teach the technique, and practitioners do it incorrectly for years.

A teacher who stops, demonstrates, has students lower in slow motion, and adjusts the shoulder and elbow position gives practitioners a foundation that prevents the cumulative shoulder injuries that bad Chaturanga technique produces. This is probably the single most important teacher contribution in a modern yoga class from a physical safety standpoint.

Cautions and Contraindications

  • Rotator cuff injuries: Active rotator cuff tears or impingement are contraindicated for full variations. Modify to knee-down or skip entirely until cleared by a physiotherapist.

    Wrist injuries or carpal tunnel syndrome: The wrist load is significant. Practitioners can easily adapt their setup by utilizing Chaturanga modifications for wrist pain, such as lowering onto the knees, keeping hands flat on elevated blocks, or shifting to forearms.

    Shoulder impingement: The shoulder position can aggravate impingement. Cobra (from the floor) is often more appropriate until the shoulder is cleared.

    Lower back pain: A sagging core creates lower back compression. Ensure the core is sufficiently engaged to maintain the plank line before practicing the full pose.

Conclusion

Chaturanga Dandasana is yoga’s most underestimated pose. It’s treated as a transition — something you do between the things that matter — and that framing means most practitioners never learn it properly and many eventually hurt their shoulders because of it.

Treat it as a posture. Build toward it. Learn the elbow-tuck. Get the shoulder alignment. Practice the knee-down version with full technique until the full version is genuinely available.

The strength it builds is real. The injury it prevents — through correct practice — is also real. Both deserve the attention.

FAQS

Q: What’s the most common mistake in Chaturanga?

A: Dipping the chest too low while the hips sag. The body should be one straight line — parallel to the floor — with the elbows at 90 degrees. Most people collapse at the shoulders and hips simultaneously.

Q: How do I build enough strength for Chaturanga?

A: Plank hold and modified Chaturanga (with knees down) are the two main builders. Don’t rush the full version. A shaky, collapsed Chaturanga done 50 times a class is less useful and more damaging than a held plank.

Q: Should my elbows flare out or stay in?

A: Stay in — hug them toward the ribs. Flared elbows dump load onto the shoulder joints in an unhealthy way.

Q: Can Chaturanga cause shoulder injuries?

A: Yes, and it does frequently in Vinyasa classes. The rotator cuff is vulnerable in the lowered position, especially if the form collapses or the volume is high. This is one of the more injury-causing poses in modern yoga.

Q: Is Chaturanga appropriate for beginners?

A: Not really — not as a full-flow element done repeatedly. Beginners should use Ashtanga Namaskara until the arm and shoulder strength is there.

Q: How long should I hold Chaturanga?

A: It’s typically a brief transitional pose (one breath) in flow yoga. As a held exercise, even 10 to 20 seconds is demanding.

READ MORE
A practitioner demonstrates the correct alignment of Dandasana on a blue mat, showcasing a long vertical spine and fully extended legs.
Blog
April 2, 2026By bharatyogas0 Comments

Dandasana -Sitting -Staff Pose

Dandasana — Sitting (Staff Pose)

Table of Contents

  1. Introduction
  2. How to Do Dandasana (Seated)
  3. Benefits
  4. Tips for Better Practice
  5. Why Learn with a Yoga Teacher or Instructor
  6. Cautions and Contraindications
  7. Conclusion
  8. FAQS

Introduction

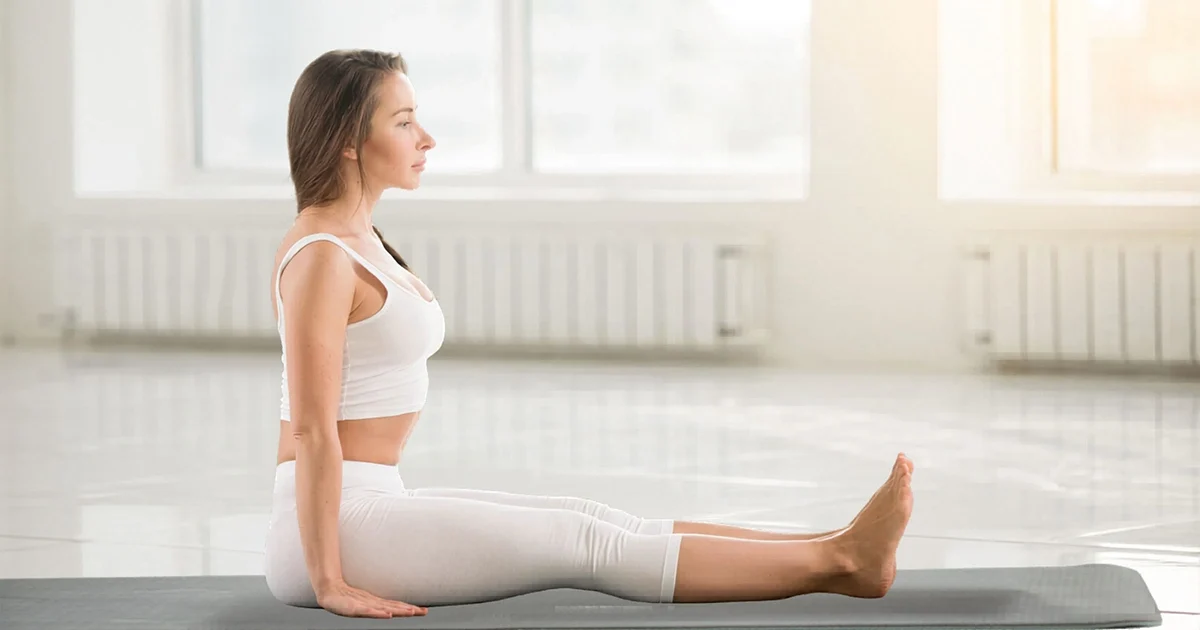
Dandasana functions as the essential base for many seated yoga poses and is the seated equivalent of Tadasana. Simple to describe — sit with both legs extended, back straight, hands on the floor — it is significantly more demanding than it appears.

Danda means staff or rod. The body in seated shape is the rod: spine vertical, legs extended, the whole sitting figure as upright and straight as possible. It’s an essential component of yoga for posture, serving as the starting position for Paschimottanasana, Janushirsasana, Navasana, and most seated postures. Getting it right matters because every forward fold and every seated twist begins here.

Most adults who’ve been sitting in chairs for decades find that sitting with legs extended and a straight back is uncomfortable within 30 seconds. The hamstrings are tight and pull the pelvis into a backward tilt, which rounds the lumbar and makes a straight spine unavailable without a fight. This position reveals this immediately and honestly.

How to Do Dandasana (Seated)

Sit on the floor with both legs extended straight in front of you, feet together or hip-width apart. The inner thighs should be rotating slightly downward and inward — a subtle internal rotation (an inward turning movement of a limb toward the midline of the body) that helps the legs sit flat on the floor.

Press the hands into the floor beside the hips. This is not just a place to put the hands — pressing actively through the palms helps lengthen the spine upward.

Engage the quadriceps slightly, pressing the backs of the knees toward the floor. Flex the feet, toes pointing toward the ceiling. Learning how to sit in Staff Pose with tight hamstrings simply means prioritizing an upright spine above keeping the legs locked flat on the floor.

The spine is upright — not military-stiff, but genuinely long. The chest is open. The chin is level. The shoulders are relaxed.

Hold for 30 seconds to 2 minutes, or use it as the starting position for other postures.

Benefits

Spinal extension awareness. Dandasana makes immediately clear whether the lumbar spine can maintain its natural curve in the seated position with legs extended. Most people find it cannot, due to hamstring tightness pulling the pelvis backward. This is exactly the information the practice needs — knowing this, practitioners can use a folded blanket to restore the pelvis to a neutral position and work from there.

Hamstring and calf stretch. Sitting with legs extended and flexed feet provides a passive stretch through the hamstrings and calves. The sustained hold, with the weight of the legs and the vertical torso creating gentle traction, produces a mild but real flexibility contribution over time.

Postural strengthening. Maintaining an upright spine without a backrest requires active work from the erector spinae and the deep stabilizers of the lumbar spine. The duration of seated practice builds endurance in these muscles.

Seated body awareness foundation. Before any seated posture — forward fold, twist, or hip opener — the practitioner must know how to sit. Dandasana teaches this explicitly: where the sit bones are, what pelvic neutral feels like, how to use the hands on the floor to lengthen the spine.

Tips for Better Practice

  • it on a folded blanket if the pelvis immediately tilts back. Elevating the hips even 2 to 3 inches can restore the pelvis to neutral and make an upright spine possible.

    Press actively through the hands. The hand pressing isn’t for balance — it’s for spinal length. Press and feel the spine lengthen upward in response.

    Flex the feet deliberately. The feet often relax into a loose neutral. Active dorsiflexion (the ankle movement that pulls the toes upward closer to the shinbone) engages the quadriceps and maintains the appropriate leg position.

    Check the lower back. It should have its natural, gentle lumbar curve — not flat, not over-arched. If it immediately flattens and rounds, exploring targeted Staff Pose modifications for lower back pain is your most appropriate response.

Why Learn with a Yoga Teacher or Instructor

The blanket height question — how much elevation is appropriate for a given student’s hamstring flexibility — is something teachers assess by observing the pelvic tilt in the seated position. They’ll also check whether the hands are actually pressing upward through the spine or just resting passively, and whether the quadriceps engagement is helping maintain the leg position.

Cautions and Contraindications

  • Severe hamstring tightness causing pain: Sit on enough blanket support that the pose is challenging but not painful. The hamstrings should stretch; they shouldn’t scream.
  • Lower back disc problems: Lumbar flexion from hamstring tightness pulling the pelvis backward can increase disc pressure. Use blanket support to maintain neutral pelvis.
  • Sciatica: Monitor whether the seated leg-extended position aggravates symptoms.

Conclusion

Dandasana is where seated yoga begins. Not the most exciting posture in any sequence, but the one that everything else grows from. A practitioner who understands their seated body — where their pelvis is, what their hamstrings allow, how to use the hands to lengthen the spine — practices every seated posture that follows with more precision and more safety.

Start here. Know this. The rest of the seated practice depends on it.

FAQS

Q: Dandasana looks easy. Why is it hard?

A: The appearance is deceptive. Sitting with legs straight, spine fully upright, and no support from the hands is surprisingly demanding on the hip flexors and core. Tight hamstrings pull the pelvis into a posterior tilt, which forces the lower back to round. Most people’s Dandasana looks like a slump.

Q: Should my hands be on the floor beside my hips?

A: Yes — fingertips press into the floor to help lift the spine. Don’t lean on them.

Q: How do I keep my spine upright if my hamstrings are tight?

A: Sit on a folded blanket to tilt the pelvis forward. This one adjustment makes Dandasana accessible for most people with tight hamstrings.

Q: Is Dandasana a warm-up pose or a pose in itself?

A: Both. It’s the foundation of all seated poses and worth practicing as a standalone for spinal alignment and hip flexor engagement.

Q: My lower back rounds no matter what I do. What’s happening?

A: Almost certainly tight hamstrings pulling the pelvis backward. Use a blanket under the hips and work on hamstring flexibility separately.

Q: How long should I hold Dandasana?

A: 30 to 60 seconds. It’s a baseline pose, not a peak pose.

READ MORE
A yoga practitioner demonstrates correct alignment in Dandasana by maintaining a rigid, straight line from head to heels in a horizontal plank.
Blog
March 31, 2026By bharatyogas0 Comments

Dandasana-Plank Pose

Dandasana — Plank Pose

Table of Contents

  1. Introduction
  2. How to Do Dandasana (Plank)
  3. Benefits
  4. Tips for Better Practice
  5. Why Learn with a Yoga Teacher or Instructor
  6. Cautions and Contraindications
  7. Conclusion
  8. FAQS

Introduction

Dandasana (widely practiced as Plank Pose) has a confused identity in modern yoga sequences. Sometimes it’s presented as a core exercise borrowed from fitness, and sometimes it’s treated as a brief transitional position — a quick shape between Down Dog and Chaturanga that doesn’t warrant much structural attention. Sometimes it’s held for a minute as a standalone challenge and called a core workout.

In the Hatha yoga tradition, the prone plank position is the horizontal form of this key discipline — the staff or rod shape applied to the prone position rather than the seated one. The same principle remains across all challenging vinyasa yoga poses: body as a straight, rigid line, every part engaged.

It deserves more deliberate attention than it typically gets. This shape is one of the most comprehensive single postures for core strength yoga and whole-body integration — front body and back body both engaged simultaneously, wrists and shoulders conditioning, core working in the position that actually matters for most movement.

How to Do Dandasana (Plank Pose)

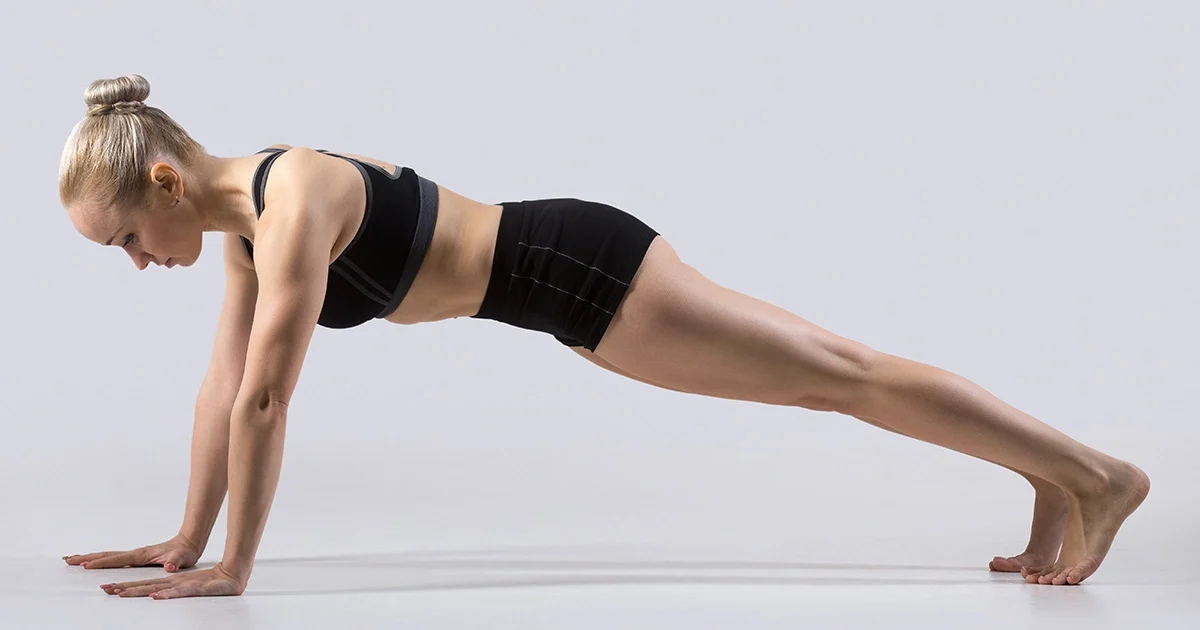
Start from hands and knees or from Down Dog. Place the hands directly under the shoulders, fingers spread, all four corners of each hand pressing into the floor.

Step the feet back one at a time until the body is in one straight line from heels to crown. The heels are stacked over the toes. The hips are at the same height as the shoulders — not sagging toward the floor, not lifting toward the ceiling.

Engage the quadriceps to keep the legs active and straight. Learning how to build core endurance with Plank Pose means focusing heavily on core engagement to maintain a completely flat back. Press the floor away with the hands. Keep the shoulder blades drawing apart — the back of the upper chest rounds very slightly upward (serratus anterior engaged) rather than collapsing toward the floor.

The head stays in a neutral position — the gaze directed slightly forward of the hands, the neck in its natural alignment.

Hold for 20 to 60 seconds, breathing steadily.

Benefits

Full-body isometric strengthening. Every muscle of the body is engaged in Plank. The hands, forearms, upper arms, shoulders, chest, core, glutes, quadriceps, and feet all work simultaneously to maintain the position against gravity. This integration is the whole point.

Core endurance. The transversus abdominis, multifidus, and the deep stabilizers of the lumbar spine work isometrically to maintain the neutral spine position against the downward pull of gravity. This is functional core strength — the kind that stabilizes the spine during all movement — rather than the flexion-pattern work of crunches.

Wrist and shoulder conditioning. The sustained load on the hands with wrists in extension conditions the wrist joint and the forearm muscles progressively. The shoulder stabilizers work to maintain the shoulder position over time. Both contribute to the capacity for more demanding arm-balancing postures.

Serratus anterior strengthening. The push-through-the-floor action in Plank — the slight rounding upward of the upper back — engages the serratus anterior, a muscle that stabilizes the scapula and is often weak in people who round their shoulders forward. Plank is one of the most direct exercises for this muscle in yoga.

Body alignment assessment. Plank is a posture that reveals alignment issues quickly. Sagging hips show weak core. Elevated hips show hip flexors dominating. Internal elbow rotation shows incorrect shoulder position. These signals are immediately available in Plank and correctable with a teacher’s guidance.

Tips for Better Practice

  • Check the hip height. The hips should be at exactly the same height as the shoulders — not higher, not lower. This is the alignment that maximizes core engagement and minimizes lower back stress.
  • Press through all four corners of each hand. Wrist load distributes unevenly when pressure concentrates at the heel of the hand. Spreading through the fingers and pressing through the index finger base knuckle reduces wrist strain.
  • Keep the serratus active. The back of the chest should push very slightly toward the ceiling — not collapsing toward the floor, not creating a sagging chest. This is a subtle but important alignment point.
  • Breathe normally. The urge to hold the breath in plank is strong. Normal, steady breathing throughout the hold is what makes it a conditioning exercise rather than a breath-holding challenge.
  • Build duration slowly. Add 5 to 10 seconds of hold time per week. Quality at 20 seconds is more valuable than a collapsing form at 60.

Why Learn with a Yoga Teacher or Instructor

The hip-height alignment is impossible to self-assess accurately without a mirror. A teacher watching from the side can see immediately whether the hips are level, sagging, or elevated. They’ll also catch the shoulder blade collapse (serratus weakness) and the internal elbow rotation that indicate technique needs correction.

For the wrist load modifications — fists, forearms, varying hand position — a teacher can determine which is appropriate for a given student’s wrist condition.

Cautions and Contraindications

  • Wrist injuries: Modify to forearms (Forearm Plank) or fists.
  • Shoulder injuries: The sustained load may aggravate rotator cuff pathology. Reduce hold time and monitor.
  • Lower back pain: If the core cannot maintain neutral spine, the lower back takes the load. Reduce to a knee-down modification until core strength supports the full position.
  • Late pregnancy: The prone plank position becomes increasingly uncomfortable. Modify to wall plank or incline plank.

Conclusion

Plank Pose is everywhere and still undervalued. Most practitioners do it too quickly, with too much sagging or too much arching, on their way to Chaturanga or Down Dog. That brief attention produces little of what Plank can build.

Hold it longer. Breathe in it. Check the hips, the hands, the shoulder blades. Plank done with genuine attention for 30 to 45 seconds produces more benefit than ten careless reps. The rod metaphor is right — be the rod, straight and engaged, every part doing its job.

FAQS

Q: My lower back sags in Plank. How do I fix it?

A: Engage the core — not by sucking in, but by creating intra-abdominal pressure. Also squeeze the glutes. Both together keep the hips in line with the shoulders and heels.

Q: Is Plank better for the core than crunches?

A: It works the core differently — more anti-extension and stabilization than flexion. Both have their place. Plank is particularly good for training the core as a stabilizer, which is more functional for most activities.

Q: How long should I hold a Plank?

A: 30 to 60 seconds is a reasonable working range. Beyond 2 minutes, form tends to break down before any additional benefit accrues. If you can hold it for 3 minutes perfectly, add load or progress to a harder variation.

Q: Can I do Plank every day?

A: Yes. It’s a relatively low-impact strength exercise with good carryover to posture and spinal stability.

Q: Is forearm plank the same as regular plank?

A: Similar core demands, different shoulder position. Forearm plank reduces wrist load and shifts work more to the shoulder girdle. Both are valid.

Q: Who should be careful with Plank?

A: People with wrist injuries (forearm plank is the modification), shoulder impingements, or acute lower back conditions.

READ MORE
A yoga practitioner demonstrates correct alignment in Parivritta Trikonasana on a mat, utilizing a block to support the lower hand during the deep spinal twist.
Blog
March 30, 2026By bharatyogas0 Comments

Parivritta Trikonasana-Revolved Triangle Pose

Parivritta Trikonasana (Revolved Triangle Pose)

Table of Contents

  1. Introduction
  2. How to Do Parivritta Trikonasana
  3. Benefits
  4. Tips for Better Practice
  5. Why Learn with a Yoga Teacher or Instructor
  6. Cautions and Contraindications
  7. Conclusion
  8. FAQS

Introduction

Parivritta Trikonasana is a profound addition to standard standing yoga poses, effectively functioning as Tadasana or a traditional Triangle with a 180-degree twist added on top. Everything that makes the regular triangle hard — the wide stance, the hamstring stretch, and the pelvic alignment — is still present, but now the torso must rotate completely, bringing the opposite hand to the front foot.

Parivritta means revolved or rotated. The triangle shape of the pose is the same as in Trikonasana; the rotation is opposite. Where Triangle opens the chest toward the sky, Revolved Triangle rotates it toward the floor and then up toward the ceiling in the opposite direction.

The result is an intense configuration among classic yoga twists that demands hamstring flexibility, thoracic rotation (the twisting movement of the middle and upper back), balance, hip stability, and core strength simultaneously. It’s one of the more technically demanding standing postures in yoga — not because any one element is impossibly hard, but because the combination of everything happening at once requires each element to be reasonably developed.

How to do Revolved Triangle Pose safely

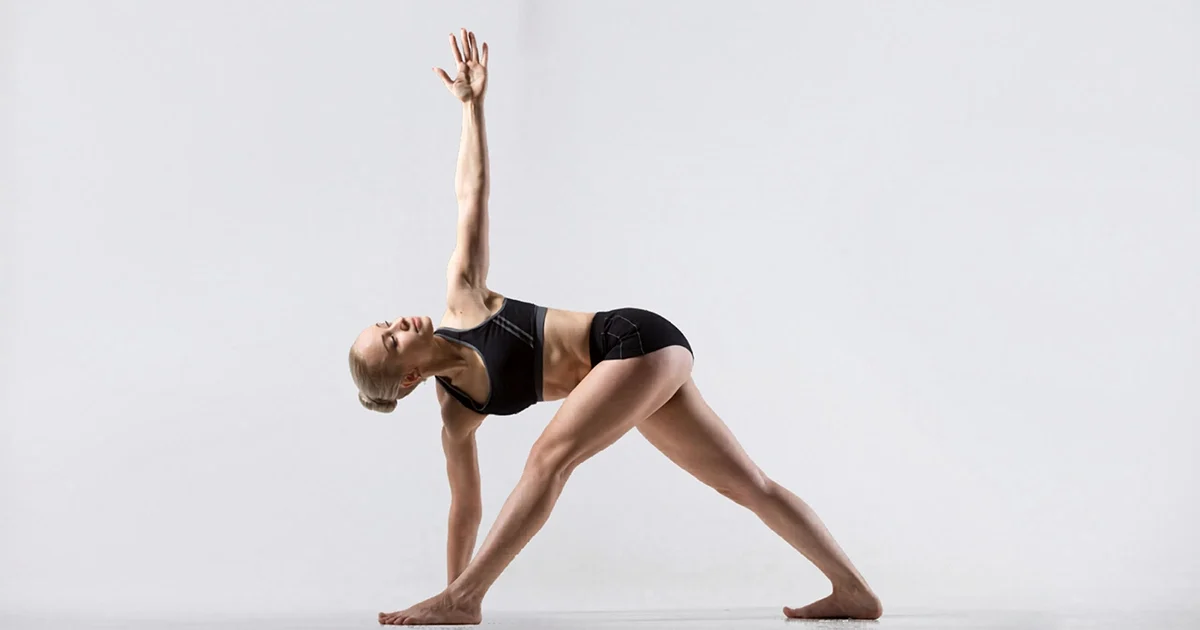
Step the feet wide — roughly 3 to 3.5 feet apart. Turn the right foot out 90 degrees. The left foot turns in to about 45 to 60 degrees. (The foot angle is slightly different from regular Trikonasana to accommodate the rotation.)

Square the hips toward the right foot. This is different from Triangle, where the hips stay more open. In Revolved Triangle, the hips turn to face the front leg. If you experience pinching or restriction, applying smart Revolved Triangle modifications for tight hips—such as widening your foot stance laterally toward the sides of the mat—will help establish a clean baseline.

Inhale and lengthen the spine. As you exhale, hinge forward from the right hip and rotate the torso to the right, bringing the left hand down toward the right foot — or to the floor on the inside of the right foot, to a block, or to the shin. The right arm rises toward the ceiling.

The spine is long in the twist, not collapsed. The gaze goes up toward the right hand if the neck allows.

Hold for 30 to 45 seconds. Return to upright on an inhale. Switch sides.

Benefits

Combined hamstring stretch and spinal rotation. Parivritta Trikonasana does two things in one position: it stretches the hamstring of the front leg (as in Triangle) while simultaneously rotating the thoracic spine. This combination is unusual — most postures isolate one or the other. The integration makes it a remarkably comprehensive single posture.

Thoracic rotation mobility. The rotation required in this pose is more demanding than in seated twists because the body is in a standing, weight-bearing position with the hamstring already under stretch. The thoracic spine must genuinely rotate to achieve the pose — compensation into the shoulder or neck can’t hide a lack of thoracic mobility the way it can in other twists.

Core and hip stability. Maintaining the wide-legged stance, keeping the hips squared toward the front leg, and not letting the back heel lift — all while rotating the torso — requires significant core and hip stability. The lateral hip muscles of both legs work hard throughout.

Abdominal organ stimulation. The rotation compresses the abdominal organs on one side while releasing them on the other. The mechanical effect on the liver, kidneys, and intestines has the same basis as other twisting postures.

Balance challenge. The wide stance in a rotation is a more complex balance challenge than Trikonasana. The center of gravity shifts during the rotation, and maintaining it requires more active work from the standing leg.

Tips for Better Practice

  • Use a block under the lower hand. More than in any other pose, a block is genuinely necessary for most practitioners of Parivritta Trikonasana. The rotation makes the depth of the forward fold less than in regular Triangle, which means the hand is further from the floor. A block at whatever height keeps the lower arm straight and the spine long is the right choice.
  • Square the hips before rotating. The hip squaring toward the front leg is what makes the rotation genuine. When the hips are open (as in Warrior II or Triangle), the thoracic rotation is reduced. Squaring them first, then rotating, accesses the full twist.
  • Rotate from the thoracic spine, not the shoulder. The shoulder reaching up is the result of the rotation, not the cause. Initiating the rotation from the belly, up through the ribcage, and into the shoulder produces a genuine thoracic twist. Reaching the shoulder back produces a shoulder movement.
  • Keep the back heel on the floor. The rotational forces of the pose tend to peel the back heel up. Press it actively into the floor throughout.
  • Lengthen on every inhale, deepen the twist on every exhale. The breath pattern that deepens all twists applies here.

Why Learn with a Yoga Teacher or Instructor

The technical complexity of Parivritta Trikonasana — hip squaring, thoracic rotation (not shoulder rotation), block height, back heel position — is a lot to self-monitor while also managing the balance and the forward fold. A teacher watching can identify which element is breaking down first (it’s usually the hip squaring or the back heel) and work on that specifically.

For practitioners building toward this pose, a teacher can sequence preparatory postures — regular Trikonasana, Warrior III, Ardha Matsyendrasana — that develop each component of Parivritta Trikonasana in isolation before combining them.

Cautions and Contraindications

  • Lumbar disc herniation: The rotation under a forward-folded position loads the lumbar discs asymmetrically. Get physiotherapy clearance.
  • Hamstring injuries: The hamstring stretch is significant. Rest active injuries.
  • Lower back pain: The combination of spinal flexion and rotation can aggravate certain lower back conditions. Reduce depth and rotation range, and monitor carefully.
  • High blood pressure or cardiac conditions: The physical demand and the rotated head position may not be appropriate. Check with a doctor.
  • Neck injuries: The gaze-upward position may need to be modified to looking straight ahead or at the floor.

Conclusion

Parivritta Trikonasana is one of the honest tests in yoga — a pose that shows you exactly what your thoracic rotation, hamstring flexibility, and hip stability are actually doing, rather than what you think they’re doing. The block doesn’t make it easier; it makes it possible to do correctly. The hip squaring isn’t optional; it’s the whole point.

Work into it gradually. Use the block. Square the hips first. Rotate the spine rather than reaching the shoulder. When those pieces assemble into the full pose — balanced, rotating, hamstring stretching, thoracic opening — it’s one of the more complete feelings a standing posture produces.

Worth the work. Always.

FAQS

Q: Is Parivrtta Trikonasana harder than regular Trikonasana?

A: Most practitioners find it significantly harder. It adds spinal rotation to the triangle shape, which requires more hamstring flexibility, hip stability, and thoracic mobility simultaneously.

Q: My hand doesn’t reach the floor. What do I use instead?

A: A block on the outside or inside of the front foot. Don’t round the spine to touch the floor — block is the right call.

Q: Which direction do I twist in Revolved Triangle?

A: From a right-foot-forward stance, the left hand goes to the floor (or block) outside the right foot, and you rotate to open the right shoulder upward. The opposite leg stays active and grounded.

Q: Why does my back foot keep lifting?

A: The back heel grounding requires hip flexor flexibility and active pressing. Keep the back leg strongly engaged and consider angling the back foot in more (45 degrees rather than perpendicular) to make the grounding easier.

Q: Is Parivrtta Trikonasana good for digestion?

A: The compression on the abdominal organs during the twist is commonly credited with stimulating digestion. It’s a traditional claim — the practical experience is that twists generally do produce some GI awareness.

Q: Who should avoid it?

A: People with low blood pressure (it can cause dizziness), severe lower back issues, or neck problems.

READ MORE
Anjaneyasana: Find Your Inner Strength and Balance with the “Crescent Lunge”
Blog
March 29, 2026By bharatyogas0 Comments

Anjaneyasana: Find Your Inner Strength and Balance with the “Crescent Lunge”

Have you ever felt “stuck” or tight in your hips after a long day of sitting? Or perhaps you’ve noticed your shoulders pulling forward, making you feel a bit closed off from the world? We’ve all been there. Our bodies are incredibly resilient, but they often need a gentle, intentional nudge to open back up and breathe.

Enter Anjaneyasana, popularly known as the Crescent Lunge or Low Lunge. This pose is more than just a stretch; it is a powerful way to reclaim your posture, boost your confidence, and build a foundation of steady strength. Named after the mother of the deity Hanuman, this pose embodies a sense of leaping forward with courage and grace.

Table of Contents

  1. What is Anjaneyasana? The Power of the Crescent Moon

  2. Step-by-Step Guide: Finding Your Flow Safely

  3. The Benefits: Why Your Body and Mind Will Thank You

  4. Internal Magic: Digestion and Deep Breathing

  5. Safety First: When to Modify Your Lunge

  6. Conclusion: Stepping Forward with Grace

The name comes from the Sanskrit Anjaneya (a name for Hanuman) and Asana (pose). When you look at someone in the full expression of this pose, their body forms a beautiful, graceful arc reminiscent of a crescent moon.

While many yoga poses focus on either strength or flexibility, Anjaneyasana is a “dual-action” pose. It builds incredible stability in your legs while simultaneously offering a deep, restorative stretch to the hip flexors and the chest. It is a favorite for runners, office workers, and anyone looking to balance their energy levels.

The best part? You don’t need a years-long yoga practice to get it right. It’s all about listening to your body and finding your own rhythm. Here’s a simple, safe way to find your flow:

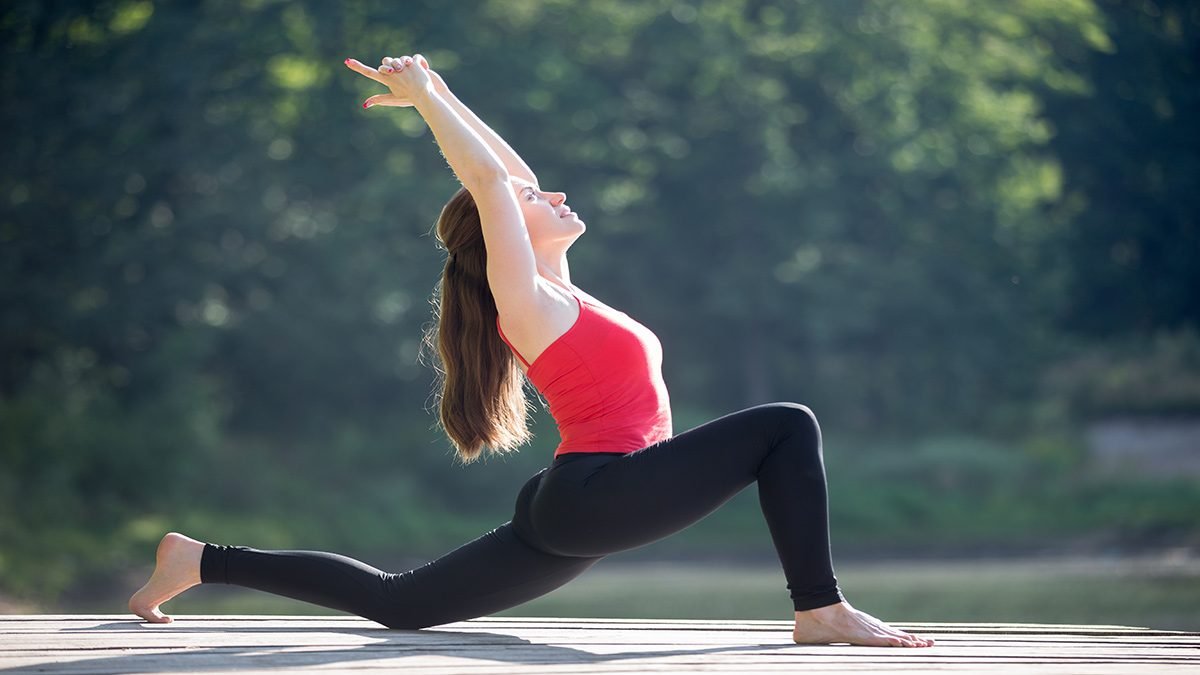
  1. Start in a Lunge: From a standing position or Downward-Facing Dog, step your right foot forward between your hands. Ensure your right knee is stacked directly over your ankle to protect your joints.

  2. Lower the Back Knee: Gently lower your left knee to the mat. You can uncurl your back toes so the top of your foot rests on the floor, or keep them tucked if that feels more stable.

  3. Find Your Balance: Place your hands on your right knee to steady yourself. Sweep your hips forward slightly until you feel a comfortable stretch in the front of your left hip.

  4. Reach for the Sky: On an inhale, sweep your arms up toward the ceiling. Your palms can face each other, or you can touch them together for a deeper challenge.

  5. Open Your Heart: Lift your chest and look slightly upward. Imagine your spine growing taller even as your hips sink lower.

  6. Breathe and Hold: Stay for 30 to 60 seconds. Focus on the breath expanding your lungs.

  7. Switch Sides: Exhale as you bring your hands back to the floor and repeat the process with the left foot forward.

Anjaneyasana is like a total-body “multibenifits.” Here is how it supports your health:

  • Releases Tight Hips: It deeply stretches the hip flexors (psoas), which are the muscles that get most shortened and tight from prolonged sitting.

  • Improves Balance: By narrowing your base and reaching upward, you engage your core and improve your overall stability.

  • Strengthens the Lower Body: It builds power in the quadriceps, hamstrings, and glutes.

  • Corrects Posture: The reaching motion helps counteract “slumped shoulders,” improving your spine’s alignment.

  • Emotional Release: We often store stress and tension in our hips. Opening this area can lead to a surprising sense of emotional relief and mental clarity.

Beyond the muscles, this pose works wonders on your internal systems:

  • Massages Digestive Organs: The gentle extension of the torso creates space in the abdominal cavity, which can help stimulate digestion and relieve sluggishness.

  • Expands Lung Capacity: By lifting the heart and stretching the intercostal muscles (the ones between your ribs), you allow your lungs to take in more oxygen, naturally boosting your energy.

  • The Knee Cushion: If the floor feels too hard on your back knee, fold your yoga mat over for extra padding or place a small towel under the knee joint.

  • Avoid “Dumping”: Don’t let all your weight collapse into your lower back. Gently pull your belly button toward your spine to support your back during the arch.

  • Watch the Front Knee: Always make sure your front knee doesn’t “overshoot” your toes. Keeping it stacked over the ankle ensures you aren’t straining the ligaments.

  • Shoulder Sensitivity: If reaching up feels painful, keep your hands on your front thigh or bring your palms together at your chest in a “prayer” position.

  • Balance Issues: If you feel wobbly, practice near a wall or keep your back toes tucked for more traction.

  • Acute Injuries: If you have recent knee or hip injuries, keep the stretch very shallow and consult a teacher or therapist first.

Anjaneyasana is more than just a stretch; it’s a gesture of courage and openness. It reminds us that to move forward in life, we need both a strong foundation and a heart that is ready to receive. Whether you do this as a morning wake-up call or a mid-day break from the office, the “Crescent Lunge” will leave you feeling grounded, spacious, and ready for whatever comes next.

READ MORE
Parvatasana: Reach New Heights of Focus and Flexibility with the “Mountain Pose”
Blog
March 28, 2026By bharatyogas0 Comments

Parvatasana: Reach New Heights of Focus and Flexibility with the “Mountain Pose”

Have you ever felt like your energy is scattered, or your posture is collapsing after hours of sitting? We’ve all had those days where we feel physically “heavy” and mentally stuck. In the world of yoga, there is a posture designed to fix exactly that.

Enter Parvatasana, or the Mountain Pose. While most people are familiar with standing mountain poses, the seated version of Parvatasana is a hidden gem for anyone looking to realign their spine and lift their spirits. It’s a posture that embodies strength, stability, and unshakeable focus—just like a mountain.

Table of Contents

  1. What is Parvatasana? The Meaning Behind the Mountain

  2. Step-by-Step Guide: How to Practice Parvatasana

  3. The Physical & Mental Benefits: Why You Need This Pose

  4. Internal Magic: Digestion and Lung Capacity

  5. Pro-Tips for Beginners and Common Modifications

  6. Safety First: Precautions to Keep in Mind

  7. Conclusion: Finding Your Inner Peak

The name comes from the Sanskrit words Parvata, meaning “mountain,” and Asana, meaning “pose.” In this posture, your body takes on a triangular shape that mimics a majestic peak.

Unlike the standing version (often called Tadasana), the seated Parvatasana focuses on rooting your base into the earth while stretching your arms toward the sky. It’s about creating an upward pull that lengthens the spine and clears the mind. In traditional yoga, it is considered a vital pose for preparing the body for deep meditation because it balances the flow of energy (Prana) through the central nervous system.

You can do this pose almost anywhere—on your yoga mat, or even in a chair at your office.

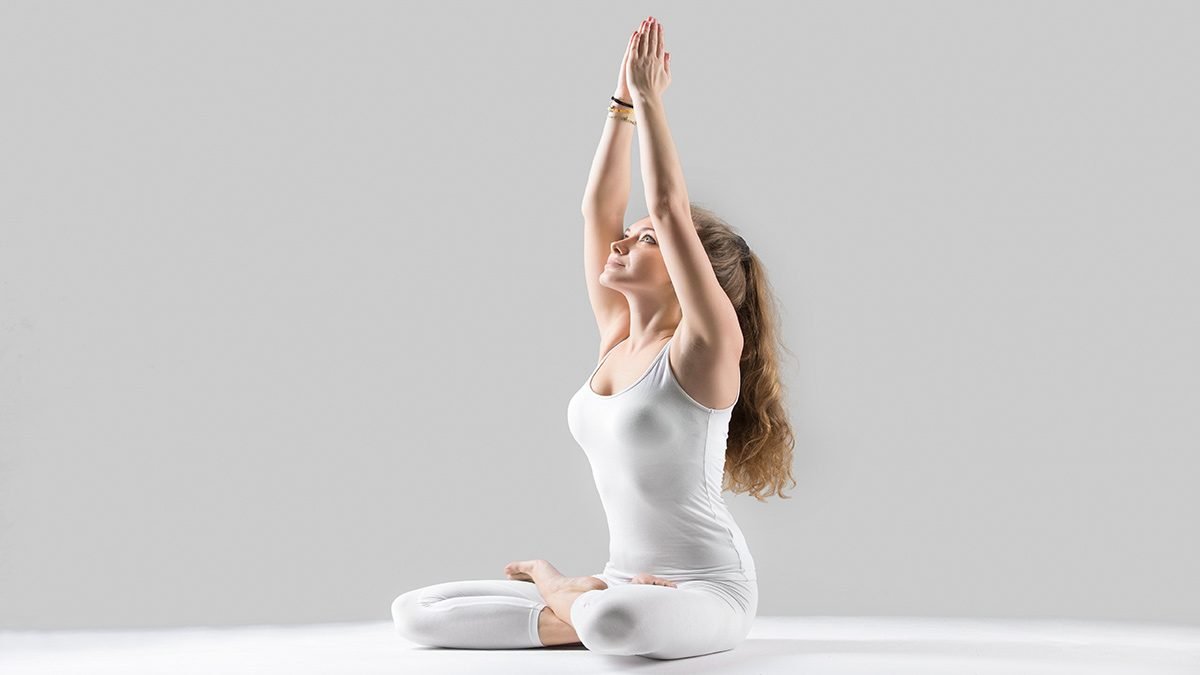
  1. Find Your Foundation: Sit comfortably in Padmasana (Lotus Pose) or Siddhasana. If those are too intense, a simple cross-legged position (Sukhasana) works perfectly.

  2. Align Your Spine: Ensure your back is straight and your shoulders are relaxed.

  3. The Interlock: Interlace your fingers in front of you.

  4. The Ascent: As you inhale deeply, slowly raise your arms above your head.

  5. Turn the Palms: Turn your palms upward toward the ceiling.

  6. Reach for the Sky: Stretch your arms as high as they can go without lifting your sit-bones off the floor. Feel your ribs lifting and your spine decompressing.

  7. Breathe and Hold: Keep your head straight and gaze forward. Hold for 30 to 60 seconds while taking slow, deep breaths.

  8. The Descent: Exhale as you slowly lower your arms and release the interlock.

The benefits of Parvatasana go deep beneath the surface:

  • Deepens Breathing: By lifting the ribcage, you give your lungs more room to expand. This increases oxygen intake, which naturally boosts your energy levels.

  • Stimulates Digestion: The upward pull creates a subtle “vacuum” effect in the abdomen, which helps stimulate the digestive organs and can assist with constipation.

  • Tones Abdominal Muscles: As you reach upward, you engage your core, helping to tone and strengthen the stomach area.

The benefits of Parvatasana go deep beneath the surface:

  • Deepens Breathing: By lifting the ribcage, you give your lungs more room to expand. This increases oxygen intake, which naturally boosts your energy levels.

  • Stimulates Digestion: The upward pull creates a subtle “vacuum” effect in the abdomen, which helps stimulate the digestive organs and can assist with constipation.

  • Tones Abdominal Muscles: As you reach upward, you engage your core, helping to tone and strengthen the stomach area.

Yoga should feel empowering, not painful. Here’s how to make it work for you:

  • The Chair Option: If sitting on the floor is hard for your knees, sit in a sturdy chair with your feet flat on the ground and perform the arm movements there.

  • Elbow Check: If you can’t fully straighten your arms, don’t worry! Keep a slight bend in your elbows until your shoulders become more flexible.

  • Wall Support: If you find it hard to keep your back straight, sit with your back against a wall. This gives you a physical guide to ensure your spine is truly vertical.

Even a gentle mountain needs to be climbed carefully:

  • Shoulder Injuries: If you have acute shoulder pain or a recent injury, avoid lifting your arms all the way up.

  • Knee Pain: If the seated position hurts your knees, move to a chair or stretch your legs out in front of you.

  • High Blood Pressure: Don’t hold your breath while stretching. Keep the breath flowing smoothly to avoid unnecessary pressure.

Parvatasana is a beautiful reminder that we can find strength and stillness even in the middle of a busy day. It takes only a minute to reach your arms to the sky, but the sense of “uprightness” and clarity it brings can last for hours. Next time you feel your energy sagging, take a breath, find your base, and become the mountain.

READ MORE
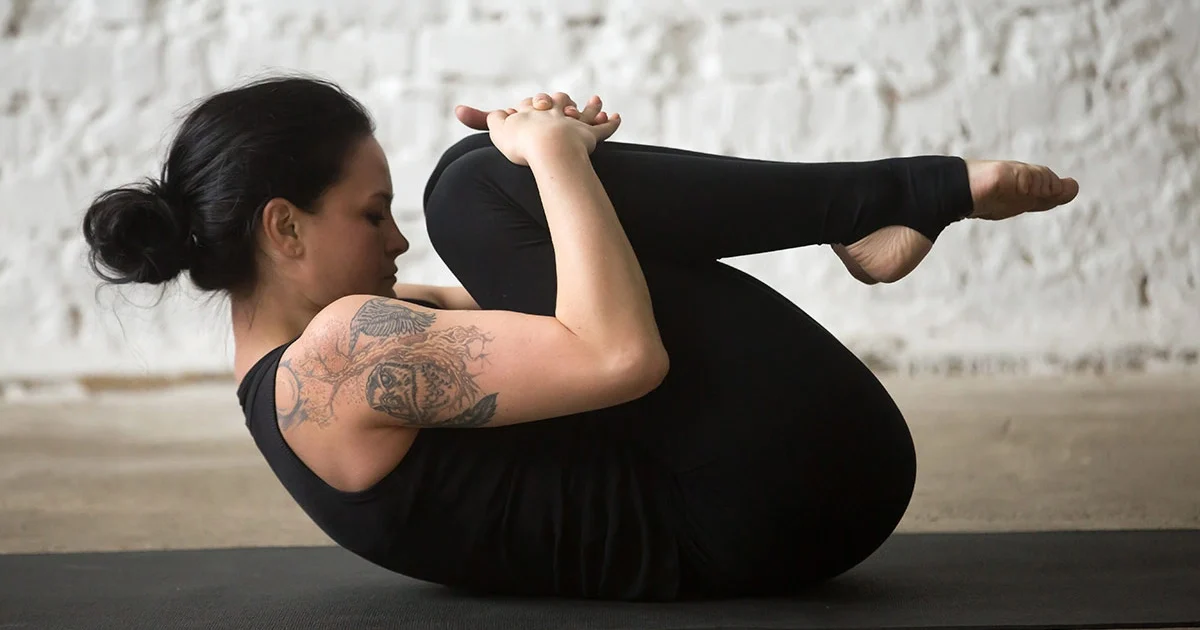
A yoga practitioner demonstrates a flat lower back and relaxed shoulders while holding Pawanmuktasana.
Blog
March 27, 2026By bharatyogas0 Comments

Pawanmuktasana: Your Natural “Reset Button” for Bloating and Better Digestion

Pawanmuktasana (Wind-Relieving Pose)

Table of Contents

  1. Introduction
  2. How to Do Pawanmuktasana
  3. Benefits of Pawanmuktasana
  4. Tips for Better Practice
  5. Why Learn with a Yoga Teacher or Instructor
  6. Cautions and Contraindications
  7. Conclusion

Introduction

Pawanmuktasana has the most literal name in yoga. Pawan means wind, mukta means release, asana means posture. It releases trapped gas from the digestive tract. That’s what it does. It does it reliably, and there’s no reason to dress this up in more elevated language.

The embarrassment people feel about discussing this is culturally learned. The digestive system produces gas. When that gas gets trapped, it causes discomfort — bloating, cramping, and the particular misery of feeling full and uncomfortable when you shouldn’t. Pawanmuktasana addresses this directly.

But the pose does more than its name suggests. The lower back stretch is real and significant. The abdominal compression has broader effects on digestive health beyond just gas release. And as a morning pose — practiced before getting out of bed or in the first minutes of practice — it helps activate both the digestive system and the lower body in a way that sets the day up well.

How to Do Pawanmuktasana

Lie flat on your back. On an exhale, draw both knees toward the chest. Wrap your arms around your shins, or clasp the hands just below the knees. Gently hug the knees in.

The lower back should be pressing into the floor, not arching up. The shoulders can relax. The head stays on the floor or can optionally lift — forehead drawing toward the knees for a more intense version.

Breathe deeply into the abdomen. Feel the belly press outward against the thighs on the inhale. Hold for 30 seconds to 2 minutes.

Rock gently side to side if you want to add a lower back massage component.

Single-leg version: keep one leg extended flat on the floor while drawing the other knee to the chest. This is gentler and appropriate for people with lower back sensitivity or those new to the pose. Hold for 30 to 60 seconds, then switch legs.

Benefits of Pawanmuktasana

Gas and bloating relief. The mechanical effect is direct: the compression of the colon (which follows a roughly rectangular path around the abdominal cavity) creates pressure that moves trapped gas toward the exit. Hugging both knees compresses the ascending and descending colon. Some practitioners practice the single-leg version in a specific sequence — right knee first (ascending colon), then left (descending colon) — to follow the path of digestion.

Lower back stretch. The flexion of the lumbar spine that hugging the knees creates is a direct counterpose to the extension that standing, backbends, and certain seated postures produce. After any backbend sequence, Pawanmuktasana provides immediate, comfortable relief for the lower back.

Abdominal organ massage. The rhythmic pressure of breath against the compressed abdomen creates a gentle peristaltic effect. Regular practice can help with sluggish digestion, constipation, and general abdominal discomfort unrelated to gas specifically.

Hip flexor and glute stretch. Drawing the knees to the chest stretches the piriformis and short external hip rotators, as well as the glutes. For people with sciatic discomfort originating from piriformis tightness, this stretch often provides immediate relief.

Morning activation. Practiced in the first minutes after waking, Pawanmuktasana helps activate the digestive system and begin the morning bowel movement process. Many practitioners find it one of the most practically useful morning rituals in their practice.

Tips for Better Practice

  • Breathe into the abdomen deliberately. The belly-breath against the compression of the thighs is what creates the massaging effect. Chest breathing in this pose misses most of the digestive benefit.
  • For the sequential version: right knee to chest, hold 30 to 60 seconds. Then left knee to chest, hold 30 to 60 seconds. Then both knees together. This follows the anatomical path of the colon.
  • Rock side to side in the full pose. The movement adds a self-massage quality to the lower back that most people find immediately pleasant.
  • Extended head-toward-knees version: lifting the head and drawing the forehead toward the knees adds spinal flexion that deepens the lower back stretch. This is appropriate for people without neck issues.
  • Practice in the morning on an empty stomach for digestive benefit, or use the single-leg version any time the abdomen feels uncomfortable.

Why Learn with a Yoga Teacher or Instructor

While Pawanmuktasana is one of yoga’s more accessible postures, a teacher can offer the breath-sequencing instructions — particularly the deliberate abdominal breath and the colon-following single-leg sequence — that make it genuinely therapeutic rather than just a basic stretch. For students with IBS, chronic bloating, or lower back pain, a teacher can integrate the pose specifically into a sequence designed for their needs.

Cautions and Contraindications

  • Hernia (inguinal or abdominal): Abdominal compression is contraindicated with active hernia. Get surgical assessment before practicing.
  • Recent abdominal or pelvic surgery: Get clearance from the surgeon before any abdominal compression work.
  • Pregnancy: Lying flat on the back becomes increasingly problematic after approximately 20 weeks due to vena cava compression. The abdominal compression of the pose is also not appropriate in later pregnancy.
  • Severe sciatica: Hugging the knees to the chest sometimes aggravates sciatic nerve irritation (depending on the cause). Monitor carefully and stop if symptoms worsen.
  • Herniated lumbar disc (severe): The spinal flexion in this pose may increase disc pressure in certain presentations. Check with a physiotherapist.

Conclusion

Pawanmuktasana is useful. Not glamorous, not transformative, not profound — useful. It does a specific job, reliably, without complications, and it takes less than two minutes.

That kind of reliable practicality is underrated. A pose you’ll actually do every morning because it makes you feel better is worth more than an advanced posture you attempt once a week. Keep it in the rotation.

FAQS

Q: Does Pawanmuktasana actually relieve gas? A: It can. The compression on the abdomen and the position of the knees to chest can stimulate movement in the digestive tract. It’s not a guaranteed fix, but it’s a reasonable tool.

Q: Can I do both legs together or one at a time? A: Both versions exist. Single-leg (Eka Pada Pawanmuktasana) is gentler and good for beginners. Double leg is more intense.

Q: Is it good for lower back pain? A: For mild tightness, yes — it gently stretches the lower back. For disc issues or acute pain, it may not be appropriate.

Q: How long should I hold it? A: 30 to 60 seconds per side, or a few slow breath cycles.

Q: Who should avoid Pawanmuktasana? A: People who have had abdominal surgery recently, or those with hernias. Also use caution with late pregnancy.

Q: When is the best time to do it? A: Morning on an empty stomach is common. Some practice it after meals for digestion, but a gap of at least 2 hours is wise.

READ MORE
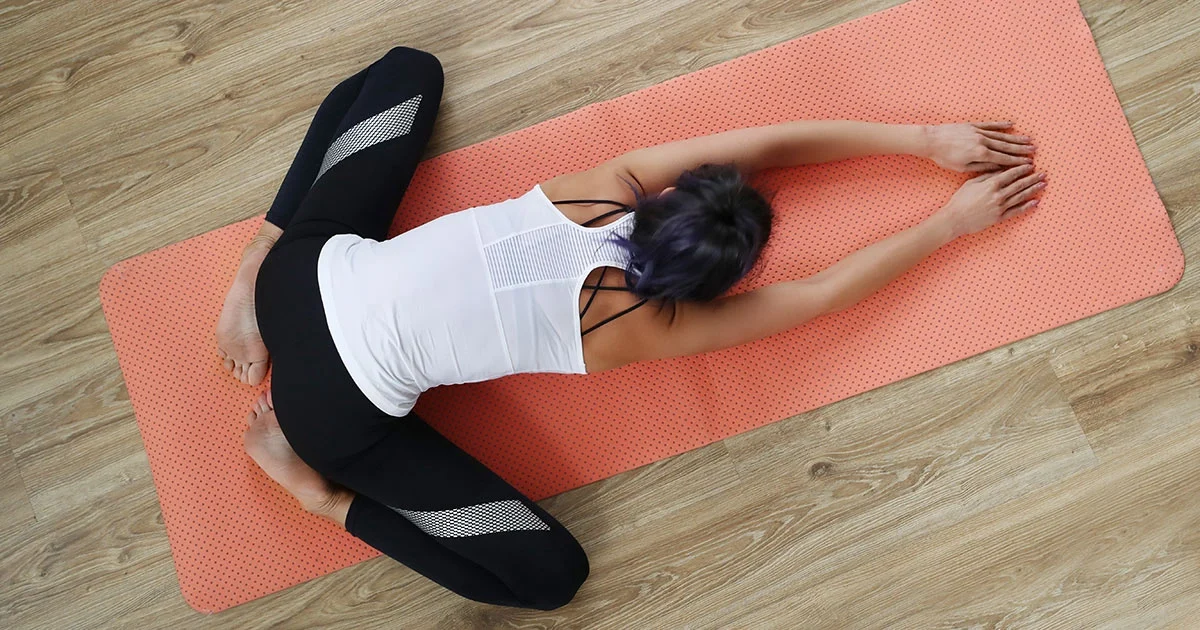
A yoga practitioner demonstrates proper spinal decompression and a relaxed neck while resting in Shashankasana
Blog
March 26, 2026By bharatyogas0 Comments

Shashankasana: The Definitive Guide to the “Rabbit Pose” for Holistic Health

Shashankasana (Rabbit Pose)

Table of Contents

  1. Introduction
  2. How to Do Shashankasana
  3. Benefits of Shashankasana
  4. Tips for Better Practice
  5. Why Learn with a Yoga Teacher or Instructor
  6. Cautions and Contraindications
  7. Conclusion
  8. FAQS

Introduction

Every yoga practice needs a pose that asks nothing from you. Shashankasana is that pose.

Shashanka means moon or rabbit in Sanskrit — both associated with stillness, cooling, and reflection. The pose does look a bit like a rabbit curled in on itself. More practically, it feels like the body exhaling everything it’s been holding.

Practiced after backbends, Shashankasana counterbalances the spine. Practiced at the end of an active sequence, it calms the nervous system. Practiced alone on a stressful afternoon, it works for that too. There’s a reason so many yoga traditions place a version of this forward fold near the end of almost every sequence.

The challenge isn’t physical difficulty. The challenge is letting the body actually rest rather than managing or performing the pose. That sounds easy. For a lot of people, it isn’t.

How to Do Shashankasana

Start in Vajrasana (kneeling, sitting on heels). Take a breath in. As you exhale, hinge forward from the hips and lay the torso down along the thighs, bringing the forehead — or eventually the crown of the head — to the floor.

There are two common arm positions. In the first, you extend the arms forward alongside the ears, palms down on the floor. In the second, you bring the arms back alongside the body, palms up, hands resting near the feet. Both work. The forward-reaching arms create a slightly more active stretch in the back and shoulders. The arms-back position is more deeply restful.

For the heel-grasp variation: while in Vajrasana, reach back and hold the heels with the hands, then fold forward, maintaining the grip, so the torso folds and the forehead or crown of the head reaches toward the floor.

Once you’re in the pose, stop doing things. Let the weight of the head release. Let the shoulders drop. Let the breath happen on its own. Stay for 1 to 3 minutes. Come up slowly on an inhale.

Benefits of Shashankasana

Spinal flexion and decompression. After backbends or active standing work, the spine has been in extension and loaded with various forces. The forward fold of Shashankasana moves the spine in the opposite direction, releasing the posterior musculature and allowing the vertebrae to separate slightly under gravity. A lot of people feel an audible or perceptible release in the mid-back as they settle into this pose.

Calming the nervous system. The folded position, head lower than the heart, breathing slowed by the compression of the abdomen — all of this activates the parasympathetic nervous system. This is the rest-and-digest state that chronic stress suppresses. Shashankasana is one of the more reliable ways yoga has of deliberately flipping that switch.

Abdomen and digestive massage. The torso resting on the thighs gently compresses the abdominal region. The slow, rhythmic pressure of breath against this compression creates a massaging effect on the intestines, liver, and other abdominal organs. Some practitioners find this helps with post-meal sluggishness and mild bloating.

Shoulder and upper back release. In the arms-forward version, the shoulders and upper back stretch substantially. For people with tension that lives permanently in the trapezius, this is often where they finally feel it release — not immediately, but after a minute or two of genuine rest.

Counterpose function. Shashankasana is most powerful immediately after Ustrasana, Ardha Ustrasana, or any backbend-heavy sequence. The spine needs the opposite direction, and this pose provides it cleanly.

Tips for Better Practice

  • If the forehead doesn’t reach the floor comfortably, use a folded blanket or block as a resting surface. Physical comfort in a rest pose is not optional — discomfort prevents the release.
  • Let the neck go. The head is genuinely heavy. Trying to hold it creates exactly the tension the pose is meant to release. Surrender the weight of the head completely.
  • Breathe into the back of the body. On each inhale, feel the back ribs expand outward. This directs the breath in a way that deepens the spinal stretch and makes long holds more pleasant.
  • Stay longer than feels necessary. Most people start to release at around 90 seconds, just when beginners are thinking about coming out. Two minutes is better than one.
  • Come up slowly. After a long hold, the spine is relaxed and blood pressure is adjusted to the folded position. Rising too quickly can cause brief dizziness.

Why Learn with a Yoga Teacher or Instructor

The adjustments available in Shashankasana are some of the most effective in yoga. A teacher can place gentle hands on the lower back, encouraging the sit bones to release back toward the heels, or apply light pressure across the upper back that creates a release in the thoracic spine that the practitioner can’t create alone.

Beyond physical adjustments, a teacher can introduce breath instructions specific to the pose — lengthening the exhale, breathing into particular areas — that make the pose work at a depth that passive holding doesn’t reach.

Cautions and Contraindications

  • Lumbar disc herniation or severe sciatica: Deep spinal flexion can increase disc pressure or aggravate nerve root irritation. Get clearance from a physiotherapist. A modified version with limited forward fold depth may be appropriate.
  • Knee problems: Use a rolled blanket between thighs and calves to reduce the degree of knee flexion. If kneeling is painful, Child’s Pose from a wider-knee position achieves a similar effect.
  • High blood pressure: Extended time with the head below the heart raises blood pressure slightly in the head. Keep holds shorter and rise slowly.
  • Pregnancy: The abdomen compression makes this pose increasingly uncomfortable through the second and third trimesters. Wide-knee Child’s Pose is a better option.

Conclusion

Shashankasana asks for one thing: the willingness to stop. No effort, no adjustment, no achievement. Just the body, the floor, and the breath moving through a shape that the spine has needed all day.

Most people find it harder than it looks. Stopping genuinely — not just going through the motions of rest — takes practice. But once it comes, this pose is one of the most reliable things yoga offers.

FAQS

Q: What’s the difference between Shashankasana and Balasana?

A: In Shashankasana, the arms are extended forward and the forehead rests on the floor. The intent and starting position differ — Shashankasana begins from Vajrasana, while Balasana starts from a kneeling position with toes together.

Q: Is Shashankasana good for stress?

A: It’s one of the better poses for that. The forward fold with the head down and the chest compressed inward activates the parasympathetic nervous system. People genuinely feel calmer after holding it.

Q: Can I do Shashankasana if I have knee pain?

A: It involves sitting on the heels, so knee pain is a real concern. Try placing a folded blanket between your thighs and calves.

Q: How long should I hold Shashankasana?

A: 1 to 3 minutes for relaxation. Shorter holds work fine in a flowing sequence.

Q: Does it help with lower back pain?

A: For many people, yes — it gently stretches the lumbar spine. Avoid it if forward bending aggravates your back.

Q: Can pregnant women do Shashankasana?

A: Modify it in later pregnancy — widen the knees so the belly has room. Avoid it if it feels uncomfortable.

READ MORE
  • 1
  • 2
  • 3
  • 4
  • …
  • 6

Links

About us
Disclaimer
Terms and Conditions
Privacy Policy
Cancellation Policy
Refund Policy

Contacts

Info@bharatyogas.com

Subscribe

    In Socials

    Fb.
    X.
    Ins.
    Lk.

    Bharatyogas

    Copyright © 2026 Bharatyogas.com. All Rights Reserved