
logotype
  • Asanas
  • Pranayamas
  • Meditation
  • Blog
  • About Us
  • Contacts
make an appointment
logotype
logotype
  • Asanas
  • Pranayamas
  • Meditation
  • Blog
  • About Us
  • Contacts
March 2026
Home2026
bharatyogas.com
BlogYoga
March 1, 2026By bharatyogas0 Comments

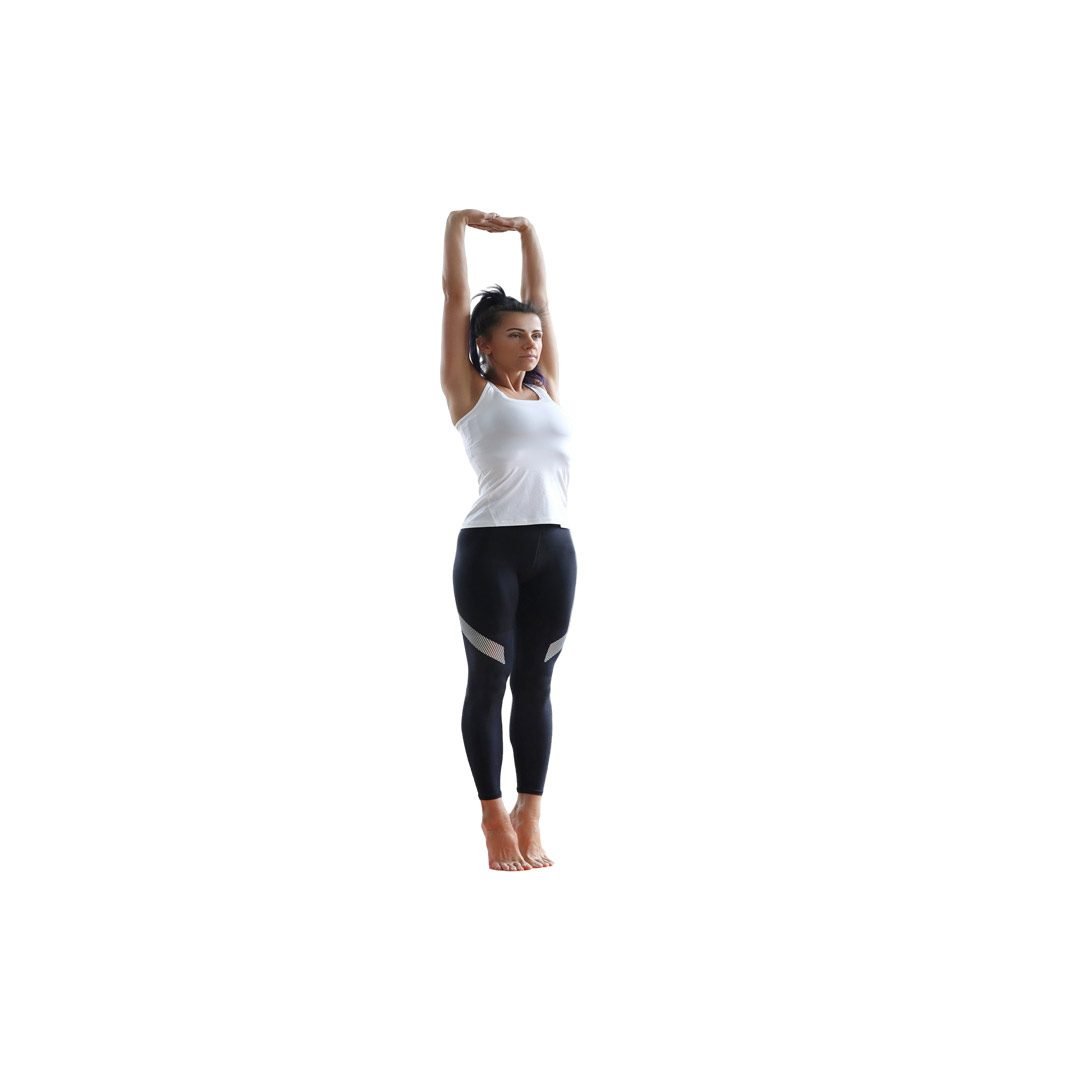
Tadasana-Mountain Pose

Tadasana (Mountain Pose)

Table of Contents

  1. Introduction
  2. How to Do Tadasana
  3. Benefits of Tadasana
  4. Tips for Better Practice
  5. Why Learn with a Yoga Teacher
  6. Cautions and Contraindications
  7. Conclusion
  8. FAQ’S

Introduction

Most people hear about Tadasana (Mountain Pose) and simply think: standing up straight. How complicated could it be? As it turns out, maintaining proper alignment in this foundational posture involves a fair amount of subtle engagement.

Fairly complicated, as it turns out.

Tadasana is the foundation of every standing yoga posture and the blueprint for proper yoga standing alignment. Everything — Warrior poses, Triangle, Tree — begins and ends here. And yet most beginners rush past it, treating it like the starting line of a race rather than a destination worth studying. That’s a mistake. Tadasana done properly is an active, engaged, physically demanding pose that reveals a great deal about how you inhabit your body.

In Sanskrit, tada means mountain and asana means posture. The mountain reference isn’t decorative — it describes the quality of stillness and groundedness the pose creates when done well. You’re not just standing. You’re rooted.

Introduction

Matsyasana is most commonly introduced as the counterpose to Sarvangasana. After Shoulder Stand’s sustained chin-to-chest flexion of the cervical spine, Fish Pose extends the neck in the opposite direction — a logical anatomical response that most practitioners feel immediately as relief.

But Matsyasana is more than a counterpose. Practiced on its own, it’s a substantial chest opener, a throat and anterior neck stretch, and a mild backbend that most people can access without significant preparation.

Matsya means fish. The pose gets this name partly because in the full traditional expression, with legs in Padmasana (Lotus), the body floats somewhat like a fish if placed in water. Most modern practitioners practice the accessible version with legs extended or in a gentle bound angle position, which is equally effective for the essential benefits.

How to Do Tadasana

  1. Stand with feet together or hip-width apart. Let the arms hang naturally at your sides, palms facing forward.
  2. Start from the ground up. Press all four corners of each foot into the floor: the ball of the big toe, the ball of the little toe, and both sides of the heel. Feel the weight distribute evenly. Most people discover immediately that they habitually lean forward or favor one foot.
  3. Lift the arches slightly. Engage the thigh muscles without locking the knees — a locked knee pushes the joint backward into over-extension (hyperextension). Tuck the tailbone just a fraction to bring the pelvis to neutral (not a hard posterior tilt, just enough to stop the lower back from over-arching).
  4. Lengthen through the spine. Lift the sternum without jutting the ribs forward. Let the shoulder blades slide down the back. Arms stay relaxed at your sides or, in some traditions, together in front of the heart in Anjali Mudra.
  5. The head: chin parallel to the floor, crown of the head reaching upward as if a thread is very gently pulling it toward the ceiling. Eyes soft, gaze forward.
  6. Breathe slowly and evenly. Stay for 30 seconds to 2 minutes.

Benefits of Tadasana

Postural correction. Tadasana trains the nervous system to recognize what neutral alignment actually feels like. After years of slouching, desk work, and phone use, most people genuinely don’t know what a neutral spine is until they’ve practiced standing in one for a while.

Balance and body awareness (proprioception).. Even with feet on the floor, the pose requires constant micro-adjustments from the stabilizer muscles of the feet, ankles, and legs. These small muscles — often completely ignored in gym training — get a steady, low-load workout every time you hold this pose.

Reduced tension in the shoulders and neck. The deliberate act of drawing the shoulder blades down and back tends to release the trapezius muscles that most people hold in chronic tension. Specifically, five minutes in Tadasana with conscious shoulder awareness easily counteracts what hours of screen time undoes.

Mental clarity. Standing upright, breathing evenly, and focusing inward creates a brief window of mental stillness. It’s not meditation exactly, but it’s close. Regular practitioners often describe Tadasana as the moment the mind slows down enough to notice the body.

Foundation for all standing poses. This is the practical one. Every alignment instruction for standing postures borrows from Tadasana: feet grounded, thighs engaged, spine long, shoulders relaxed. Knowing the pose deeply means every standing posture has a clearer reference point.

Tips for Better Practice – how to improve posture with tadasana

  • Close your eyes for 10 seconds while standing in Tadasana. You’ll immediately notice how much your eyes were compensating for the body’s imbalances. The slight wobble when eyes close is useful information.
  • Don’t lock the knees. Soft engagement is different from forcing the joints into hyperextension.
  • Check your weight distribution. Most people lean slightly forward without knowing it. Try pressing the heels consciously into the floor.
  • Video yourself from the side occasionally. The difference between what you feel and what’s actually happening is often surprising.
  • If balance feels shaky, bring feet hip-width apart rather than together. Stability before precision.

Why Learn with a Yoga Teacher –

mountain pose alignment mistakes beginners

You might think Tadasana is the one pose you don’t need a teacher for. In some ways that’s fair — it’s not dangerous. But a teacher sees things you can’t: whether your weight distribution is even, whether the pelvis is truly neutral or just feels like it is, whether the neck is creating compensatory tension.

A good teacher will also give you something specific to work with in the pose — a breath instruction, a visualization, an alignment cue — that transforms it from “just standing” into a genuine practice. That shift in perception is worth a lot.

Cautions and Contraindications

Tadasana is safe for virtually everyone. A few things to note:

  • Low blood pressure: Standing still for extended periods can cause dizziness. Sit down if you feel lightheaded.
  • Flat feet or severe overpronation: A physiotherapist or podiatrist can advise on foot alignment. Some people benefit from a slight modification in how the feet are placed.
  • Vertigo or balance disorders: Practice near a wall or with a chair nearby. Standing close to support doesn’t diminish the practice.
  • Varicose veins: Prolonged standing may be uncomfortable. Shorter holds or movement between Tadasana and other poses helps.

Conclusion

Tadasana doesn’t get the credit it deserves because it doesn’t look like work. For instance, no one photographs Tadasana for Instagram. In addition, the understanding it builds — of balance, alignment, and the quiet discipline of standing well — runs through every other standing posture you’ll ever practice.

Beginners often can’t wait to move on from it. Experienced practitioners often return to it as one of the most interesting poses in the entire practice. That arc is worth paying attention to.

Note: 

explore faqs

We hope you find what you are looking for

01Q: Is Tadasana actually a yoga pose or just standing?

A: It looks like standing, but there's a lot happening — feet grounded, spine tall, shoulders back, arms active. Most people stand with a slouch or uneven weight. Tadasana makes you aware of all of that.

02Q: How long should I hold Tadasana?

A: 30 seconds to a minute is typical. It's more about the quality of your attention than the clock.

03Q: Can Tadasana help with posture?

A: Yes, and it's one of the better poses for it. It trains your body to find neutral alignment, which carries over into how you sit and walk.

04Q: I feel my legs shaking in Tadasana. Is something wrong?

A: Not usually. Your stabilizer muscles are waking up. If it persists for weeks, check with a teacher — but early shaking is pretty normal.

05Q: Can pregnant women do Tadasana?

A: Generally yes, with feet slightly wider for balance. Check with your doctor in later trimesters.
READ MORE
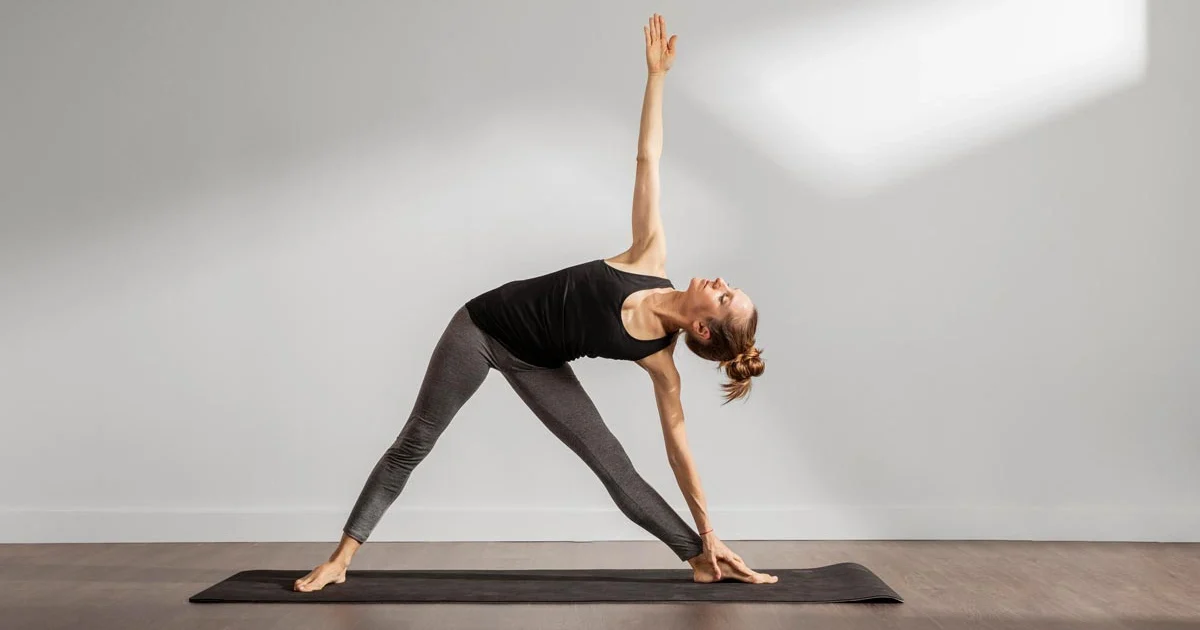
A yoga practitioner demonstrates proper side body opening and safe alignment in Trikonasana Triangle Pose on a mat.
BlogLife StyleTrendingYoga
March 1, 2026By bharatyogas0 Comments

Trikonasana-Triangle Pose

Trikonasana (Triangle Pose) Where Stability and Stretch Meet

Table of Contents

  1. Introduction
  2. How to Do Trikonasana
  3. Benefits of Trikonasana
  4. Tips for Better Practice
  5. Why Learn with a Yoga Teacher
  6. Cautions and Contraindications
  7. Conclusion

Introduction

Triangle Pose looks clean and geometric from the outside — two triangles formed by the body and the floor, everything at right angles and straight lines. The reality is more complicated. The pose asks the body to do several conflicting things simultaneously: lengthen, stabilize, open laterally, and stay grounded — all without collapsing anywhere.

Trikona means triangle. The name captures the shape but not the experience. The experience is of finding length in directions the body doesn’t usually move, while the legs work hard to keep everything stable.

Trikonasana appears in almost every yoga tradition and almost every beginner sequence. That prevalence reflects its value: it addresses strength, flexibility, and body awareness in a single posture, and it does so with relatively low injury risk when practiced with decent alignment.

How to Do Trikonasana

Step the feet wide — about 3.5 to 4 feet apart, depending on your height. Turn the right foot out 90 degrees so it points directly to the right. Turn the left foot in approximately 15 degrees. The right heel should roughly align with the arch of the left foot.

Extend the arms out to the sides at shoulder height, parallel to the floor. Take a breath to lengthen the spine.

On an exhale, reach the right arm out to the right as if trying to touch the right wall. When you’ve reached as far as you comfortably can, hinge at the right hip and let the right hand descend toward the right shin, ankle, or floor. The left arm rises toward the ceiling.

Two things are happening simultaneously and must both be maintained: the torso is opening to face the side wall (not rotating downward toward the floor), and both legs are straight. Think of it as a side-opening, not a side-bend.

Turn the head to look up at the raised left hand if the neck allows; look straight ahead if not.

Hold for 30 to 60 seconds. Inhale to come back up. Switch sides.

Benefits of Trikonasana

Hamstring and inner thigh stretch. The front leg’s hamstring receives a significant stretch in the lateral hinge. The inner thighs of both legs stretch differently depending on foot placement and stance width.

Lateral torso lengthening. The intercostal muscles between the ribs, the obliques, and the quadratus lumborum (a deep lower back muscle) all stretch in the side-opening of the pose. These muscles rarely get lengthened in conventional exercise, which tends to focus on forward and backward planes of movement.

Thoracic rotation. The chest opens to face the side, which requires rotation through the thoracic spine. Regular practice improves rotational mobility in the mid-back, which directly benefits most sports and daily activities.

Leg and core strength. The legs work hard to maintain the wide stance. The obliques and core muscles engage to prevent the torso from collapsing forward. This is subtle but real strengthening.

Balance and proprioception. Less obviously, Trikonasana challenges balance through a wide, offset stance. The stabilizer muscles of both ankles and feet are engaged throughout.

Tips for Better Practice

  • Don’t let the hand reaching toward the floor pull the torso forward. The torso must face the side. If the only way to reach the floor is to rotate forward, use a block under the lower hand.
  • Keep both sides of the waist equally long. It’s common to crunch the lower side; consciously extend both sides as if trying to lengthen equally in both directions.
  • Press the outer edge of the back foot into the floor firmly. This is the anchor of the pose.
  • The bottom hand doesn’t need to touch the floor. Shin, ankle, or a block at any height is completely appropriate.
  • Stack the hips, don’t collapse them. The right hip should reach forward and down, not collapse toward the left.

Why Learn with a Yoga Teacher

The most common error in Trikonasana — rotating the torso downward toward the floor rather than opening it laterally — is difficult to self-correct because it doesn’t feel wrong from the inside. The rotation feels like depth, but it’s actually a loss of the lateral opening that makes the pose worthwhile.

Teachers often use cues like “keep your back against a wall” to help students feel the correct plane of movement. Physical adjustments — a gentle hand on the hip or the shoulder — can immediately show a student what the pose should feel like. This kind of tactile feedback is hard to replicate through self-practice alone.

Cautions and Contraindications

  • Practicing Trikonasana safely requires a deep understanding of your body’s structural limitations. In fact, rushing into this foundational alignment without reviewing your individual health profile can lead to unnecessary strain. Therefore, understanding the specific safety parameters of this posture is essential for a sustainable daily practice.

    • Low blood pressure: Transition carefully between sides and use a slower breath. Specifically, coming up too quickly from standing yoga postures can cause sudden dizziness.

    • Neck problems: If you need to know how to modify triangle pose for neck pain, simply look straight ahead or down rather than up at the raised hand. Forcing the neck into deep rotation when there’s already a neck joint (cervical) issue isn’t worth the physical risk.

    • Knee injuries: The front knee joint should never lock backward or over-extend (hyperextend). Instead, keep a tiny micro-bend in the leg if your hamstrings are very tight.

    • Disc herniation in the lumbar spine: Work directly with a teacher to determine your appropriate depth. Sometimes a shallower side bend is the best form of yoga for lateral flexibility, while other times forward bending (flexion) is restricted by the disc issue, which severely limits how much the hip can hinge.

Trikonasana rewards careful practice far more than most other standing yoga poses. However, the common tendency is to push aggressively for depth—forcing a lower hand or more torso rotation—when the actual value of the pose is in the quality of the side body opening. This spaciousness is often lost precisely when people try hardest to go deeper.

Less depth with better alignment. More consistency over time. These produce lasting results. That’s the core Triangle Pose principle, and it applies to a lot of things outside yoga.

FAQS

Q: Where should my bottom hand go in Trikonasana?

A: On your shin, ankle, a block, or the floor — wherever you can reach without collapsing the chest. The goal is to open the torso, not just touch the floor.

Q: My top shoulder keeps rolling forward. How do I fix it?

A: Think about rotating your chest toward the ceiling rather than just reaching your arm up. Imagine the two shoulders stacked vertically.

Q: Is Trikonasana good for the hamstrings?

A: Yes, it’s a good hamstring stretch, especially for the front leg. It also works the side body, hips, and thoracic spine.

Q: Can I do Triangle Pose with tight hamstrings?

A: Yes — bend the front knee slightly. You get most of the benefits without straining the hamstring.

Q: How wide should my stance be?

A: Roughly 3 to 4 feet, depending on your height. Wide enough that your front thigh is mostly parallel to the floor when you fold sideways.

Q: Should my back foot be perpendicular to the front foot?

A: The back foot is typically turned in slightly — about 45 to 60 degrees. Full perpendicular can stress the knee.

READ MORE
  • 1
  • …
  • 3
  • 4
  • 5

Links

About us
Disclaimer
Terms and Conditions
Privacy Policy
Cancellation Policy
Refund Policy

Contacts

Info@bharatyogas.com

Subscribe

    In Socials

    Fb.
    X.
    Ins.
    Lk.

    Bharatyogas

    Copyright © 2026 Bharatyogas.com. All Rights Reserved